The Better You Reflect Yourself, More Stronger Your Team Will Be - The Concept of Designing Retrospective -

日本語版はこちら

上手に振り返る。チームがもっと強くなる。 ~レトロスペクティブを設計するという考え方~ - Junks, GC cannot sweep

Introduction

It's been a long since the last update.

First, a bit of an update about myself: My relocation to Estonia was cancelled due to the COVID-19 pandemic, and I am currently working as a consultant at the Japanese branch of a Finnish design firm.

It's been almost four years here, thanks to the high technical skills of my colleagues, their deep understanding of Agile, and the one-on-one coaching from an in-house Scrum trainer.

After participating in several projects at my current job, I feel that my own understanding of Agile and Scrum has deepened to some extent, and I'm thinking of submitting a proposal to RSGT 2025.
I wrote this article intending to for the proposal, so if you don't mind, please consider giving a like to my proposal.

confengine.com

As it's been a long since the last post, I would like to describe some about the Retrospective in Scrum, which I discussed deeply with my Agile Coach.

I shared this content with my junior engineer friend and he said it's worth paying me some drinks, so I am expecting that you would enjoy a lot if you are interested in Agile or Scrum

Agenda

The Quality of Retrospectives Reflects the Quality of the Team and Ultimately the Product

Are you conducting retrospectives in your team?

When I ask this question to the developers in Scrum team, many respond, "We do it properly every sprint," or "We allocate time every other week."

However, when I ask what actually they do, I often find that they are merely writing down KPT (Keep, Problem, Try) and just sharing it among the team.

Retrospectives are activities that handle "Inspection" among the three pillars of Scrum: "Transparency," "Inspection," and "Adaptation." They also serve as activities to prepare for Adaptation.

The quality of this "Inspection" directly impacts the quality of the team and ultimately the product.

Therefore, simply writing down KPT and presenting it may be somewhat insufficient.

Scrum also has Sprint Reviews as a representative inspection event.

The Sprint Review is an inspection of the product, responsible for how to improve the product.

On the other hand, the Retrospective is an inspection of team activities, responsible for how to improve the quality of team activities.

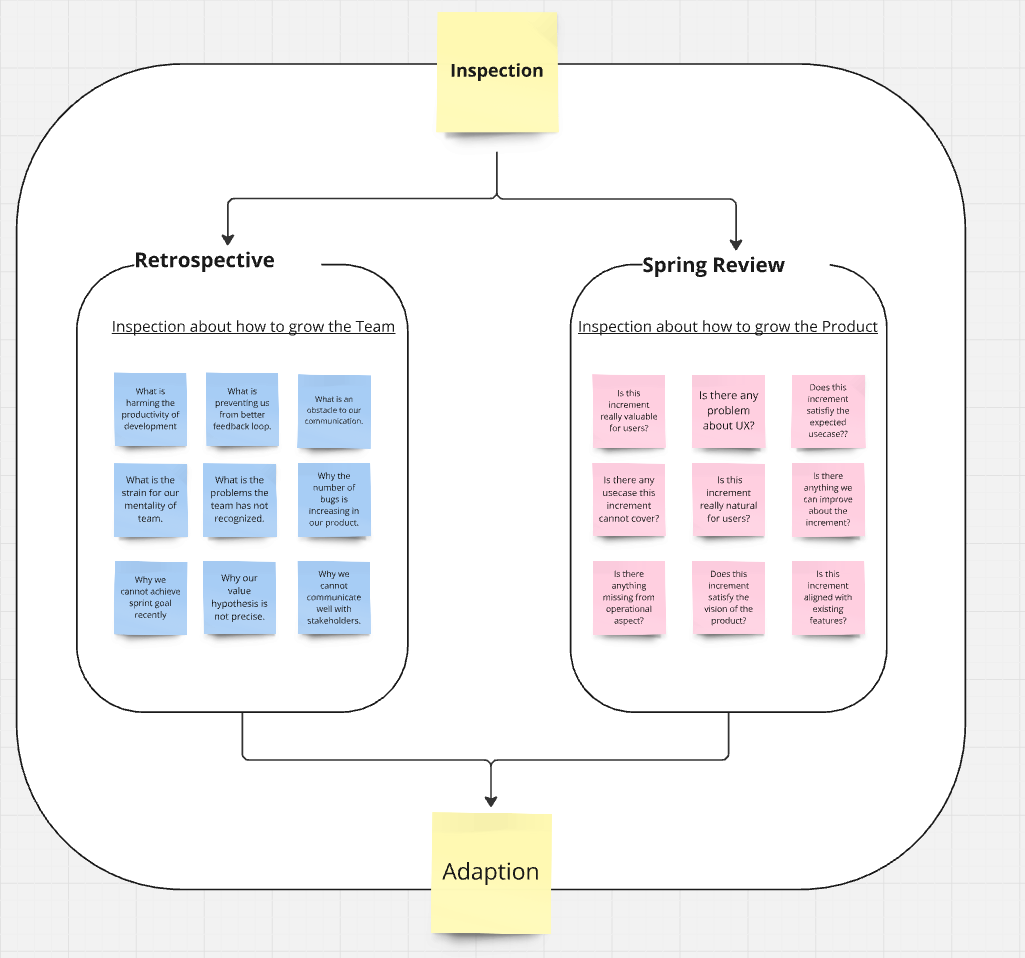
I have summarized the representative inspection perspectives in a diagram based on what came to mind.

Diagram about Inpsection/Adaption of sprint review and retrospective.

Looking at it this way, you can see that each event has a very large number of topics, and it's clear that just discussing them briefly won't lead to improvement.
To efficiently discuss these topics and ac## Designing a Retrospective

Designing the Retrospective

What does it mean to design a Retrospective?
Including retrospectives, most meetings have a purpose.
Purposes vary, such as brainstorming, information sharing, or deciding on measures to address immediate issues.

Whether the participants of the retrospective can smoothly reach that purpose depends greatly on the quality of the agenda and facilitation.

Elements like how to conduct the proceedings, what methods to use for discussions, whether to encourage divergence or convergence and how to draw conclusions are important.

From that perspective, considering the agenda and discussion methods to guide participants efficiently and appropriately towards the purpose is the idea of designing a retrospective.

tually run an improvement cycle that enhances team activities, it's necessary to properly design each event and guide the team into discussions.

Although we won't touch on Sprint Reviews this time, the idea of designing events and meetings is useful in various situations, so please consider it if you're interested.

Phases and Tools

As we begin designing retrospectives, let's look at retrospectives from the perspectives of Phases and Activities.

Phases are, as the word suggests, stages of discussion.
In the design stage, we consider what steps to take in the discussion to efficiently reach a conclusion.
For example, if there are four phases—Sharing, Divergence, Analysis, and Decision-making—we examine questions like Is it sufficient to have one round each of divergence and analysis? Is decision-making necessary? How much time should be allocated to each?
While retrospectives have their own purposes, each phase also has a purpose, and the tools used to achieve the purpose of each phase are the activities described next.

Activities refer to what methods of discussion are used in each phase.
For example, KPT, which was mentioned at the beginning, is one of the activities used for conducting discussions.
Other activities that many of you may be familiar with include "Sailboat Retrospective," "5 Whys," "Brainstorming," and "Good/Bad/Ugly."
Each activity has its strengths and weaknesses, and it's necessary to consider combinations based on the team's situation, the phase of discussion, and the required time.
By combining appropriate activities for each phase, you can proceed with discussions more efficiently.

In this way, analyzing the timebox of the retrospective and the team's situation, and considering combinations of discussion stages (phases) and discussion methods (activities) forms the basis for designing a retrospective.

Moreover, this way of thinking can be used in regular meetings as well, so please try using it not only for retrospectives but also in workshops, presentations, and various other situations as needed.

Note that the quality of the design can vary greatly depending on the number and maturity of the activities you have at your disposal.
If you're not familiar with many activities or don't know how to conduct them, please consider reading 'Agile Retrospectives: Making Good Teams Great' listed in the References section.
It introduces a large number of tools.

The Five Phases of a Retrospective

Now, you might be unsure where to start if you're suddenly told to design a retrospective.
Don't worry. In Scrum retrospectives, there is a commonly used framework called the "Five Phases."

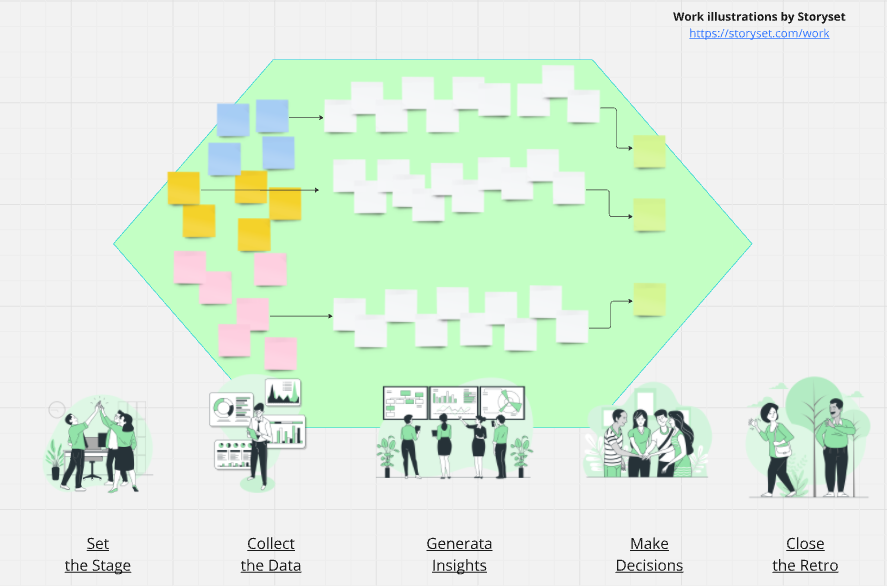
This is the idea of dividing the retrospective time into five phases and combining activities in each to lead to conclusions.

Below is a simple summary of these five phases. The time in parentheses is a guideline for time allocation when designing a one-hour retrospective.

  1. Set the Stage - Get Ready for Discussion (within 5 minutes)
  2. Collect the Data - Gathering data (about 10 minutes)
  3. Generate Insights - Analyzing data (about 30 minutes)
  4. Make Decisions - Deciding what to do (about 10 minutes)
  5. Close the Retro - Closing the retrospective (within 5 minutes)

Image of Retrospective Progression

In this framework, you prepare for discussions, gather discussion topics, discuss the collected topics, decide what to do, and get ready to move forward.

Now, let's explain each phase.

Set the Stage - Get Ready for Discussion

In this phase, we have to get ready so that all participants can discuss comfortably.

It is important that all participants can participate in the discussion. However, in unfortunate retrospectives, sometimes a few strong-willed individuals dominate the conversation, or those who miss the initial opportunity to speak remain silent until the end.

This phase is intended to have all participants feel, "We are about to participate in a discussion," and "It's okay to speak up here," and it serves as a place to establish and confirm rules for that purpose.

Having everyone participate in the discussion and express their opinions in the place where the team's direction is decided not only gathers multiple perspectives but also leads to a sense of ownership when implementing the improvement plans decided in the retrospective.

This phase tends to be overlooked, but unless time is severely constrained due to delays, please make sure to carry it out.

What to do in this phase greatly depends on the team's maturity.
I will introduce two activities for different maturities.

Check-In

For example, if the team has high psychological safety and each member can actively express their opinions, it's fine to just have them say a few words.

Originally, check-in is an activity to help participants focus on the retrospective, so the rule is to have them share what they expect from the retrospective or their current situation, but there's no need to stick strictly to that.

Questions like "Share your thoughts on this week's sprint in one word!", "Describe your current mood in 20 characters!", or "Tell us what you had for lunch today and your thoughts on it in one sentence!" are sufficient.

This isn't because we want to know the answers to these questions or to engage in team bonding; it's more like a warm-up to create an atmosphere of "I'm about to speak up" and "I'm going to express my opinion."

It may seem meaningless, but whether or not you do this activity can significantly affect the liveliness of the discussion.
Even if it feels silly, please make sure to do it.

In my company, we often start by doing an activity where each person places their name on the "Wheel of Emotions" and shares briefly why they chose that spot.

Wheel of Emotions
Image source: From File:Plutchiks-emotional-wheel.png - Wikimedia Commons.

Team Agreements

On the other hand, in teams where some strong-willed individuals tend to dominate the conversation, start by establishing and confirming discussion rules.

Specific rules might include: "Be mindful so that everyone speaks an equal amount," "Do not interrupt and listen until someone finishes speaking," "If you feel it's hard to join the conversation, give a signal," "If you talk for more than one minute, check if other members have opinions or questions," and "Do not take away the speaking opportunity from someone the facilitator has designated."

These rules can be decided by the facilitator or Scrum Master, but it might be good to take some time during the retrospective to discuss them.

If they are agreements decided as a team, both members who tend to talk too much and those who are not good at speaking can participate in discussions with mutual understanding.

Also, if there are members in higher positions, it can be effective to ask them in advance to moderate the frequency and intensity of their comments.

Collect the Data - Gathering Data

Once all participants are ready to speak, the next step is to gather seeds for discussion.

When you think of data, you might imagine quantitative elements like completed story points, man-days, or the number of PRs. However, the data referred to here also includes qualitative elements such as emotions, opinions, and events.

Posting KPTs (Keep, Problem, Try) is also one of the data collection activities. KPT is a tool that handles everything from data collection to decision-making in one go, but at this point, it's better to treat "Try" as something like "things we think we should do."

Specific data examples include the following:

Quantitative Data and Tools for Obtaining Them

  • Transition of completed story points: Jira, etc.
  • Lead time of development activities (※1): Findy Teams, etc.
  • Values of 4 Keys (※2): Jira, Findy Teams, etc.
  • Actual working hours (※3): Team calendars on Kanban boards, groupware, etc.

※1 From initiation to design creation, from design completion to development start, from development start to PR creation, from PR creation to merge, from merge to deployment, etc.
※2 Deployment frequency, change lead time, change failure rate, time to restore service
※3 Total working hours within the sprint, excluding vacations, meetings, Scrum events, etc.

Qualitative Data and Representative Activities

  • Feedback on team activities: Keep/Problem/Try, etc.
  • Feedback on team status: Good/Bad/Ugly, Sailboat Retrospective, etc.
  • Events within the sprint: Timeline, etc.
  • Emotional feedback from members: Mad/Sad/Glad, etc.

Of course, it's not realistic to collect all of this data, and too much information becomes noise. Please have the facilitator decide what data to collect and how, after confirming in advance what the Scrum Master and team members want to discuss.

Also, one point to keep in mind is that the most important part of a retrospective is the discussion and analysis that follows. Therefore, using tools that automatically collect data or gathering KPTs in daily activities are very effective ways to reduce the time spent on data collection.

Actually, it was repeatedly pointed out during mentoring meetings with a Scrum Trainer, and we created a board to regularly collect timelines and emotional/activity feedback.

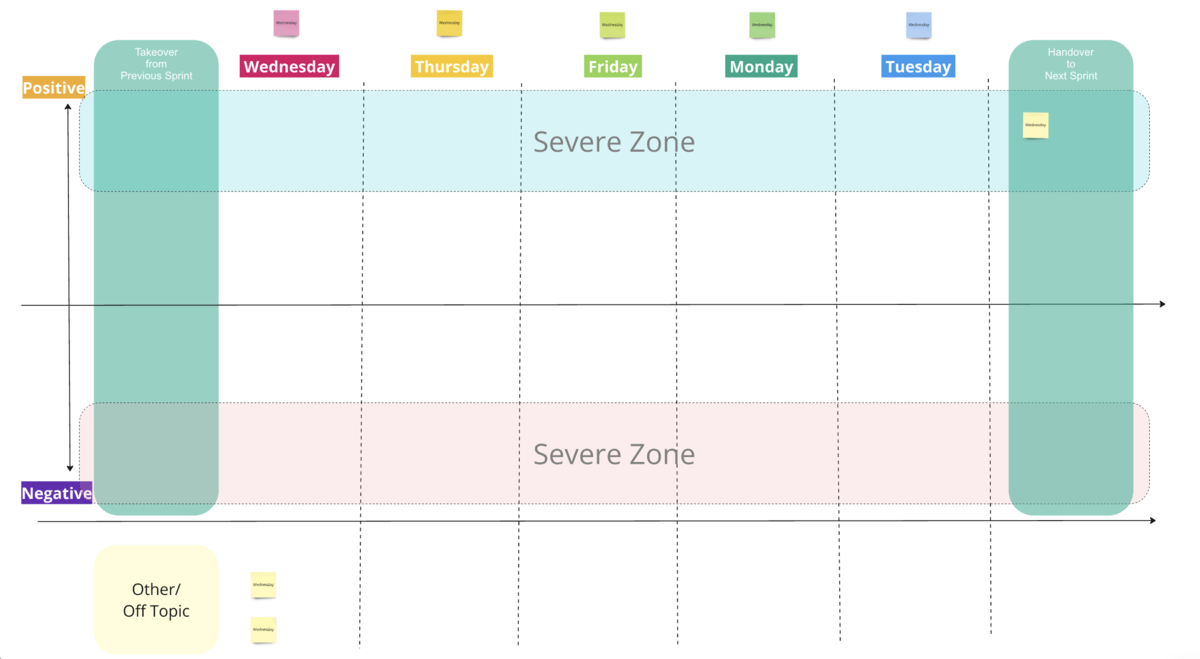
Original feedback board created during mentoring meetings

Also, in the team I participated in, we prepared a space called Found and Resolved, which was set up to put sticky whenever someone noticed something they wanted to discuss with the whole team.

Generate Insight - Analyzing Data

Next is the data analysis phase. As mentioned at the end of data collection, this phase is the core of the retrospective. We bring together the collective wisdom of all team members to analyze the collected issues and explore solutions.

Selecting Topics to Discuss

Before starting the data analysis phase, the first thing to do is select the issues to discuss. Each member has their own sense of issues, and various topics come up during data collection.

However, since the time available for discussion and for implementing improvements is limited, it's necessary to narrow down the topics to decide which problems to solve or which good points to further enhance.

My recommended methods for narrowing down topics iare Dot Voting and Heat Maps.

Dot Voting

Dot voting is a commonly used method, so many of you may already know it, but I'll explain it for just in case.

In Dot Voting, you decide on the number of votes per person (e.g., 3 votes) and vote on the topics collected during data collection that you want to discuss. Limiting the number of votes allows each member to prioritize topics.

The topics that receive the most votes become those with high team interest, and the impact when improved becomes greater. Dot voting can be done in a short time and has the advantage of simplicity and easiness of understanding.

However, one caution is that when conducting dot voting, you need to ensure that it's not apparent who voted for what, such as by color or name.

If voters are identifiable, there's a possibility that votes may be skewed due to power balances within the team. To select topics that all team members can discuss on an equal footing, use anonymous dots of the same color.

Heat Maps

Personally, I recommend Heat Maps over Dot Voting. It's an extension of dot voting, where you vote with as many dots as you like, up to a set limit, on the topics collected during data collection that you want to discuss.

The number of dots represents your level of interest in that topic. For example, if the maximum is 3 votes, it can be interpreted as follows:

  • 1 vote: Interested
  • 2 votes: Want to discuss
  • 3 votes: Really want to discuss

After voting, tally the number of dots as in dot voting, and start discussing the topics with the most votes in order.

The good thing about heat maps is that they reflect the strength of each member's will.

In dot voting, topics that aren't of much interest may still receive votes, but in heat maps, the level of interest affects the number of votes.

By using heat maps, topics that may not have gained much consensus but are very important to certain members also get attention, allowing problems noticed only by some members to be selected for discussion.

Deepening the Discussion

Once you've narrowed down the topics to discuss, move on to the discussion. Share opinions and ideas on the selected topics, and share what you'd like to try or do.

You can conduct the discussion freely until a conclusion is reached, but by using tools like Fishbone Diagrams, 5 Whys, or Lean Coffee, you can proceed more efficiently.

I myself often use Lean Coffee in 1-on-1s and regular meetings, so I'll explain Lean Coffee here.

Lean Coffee

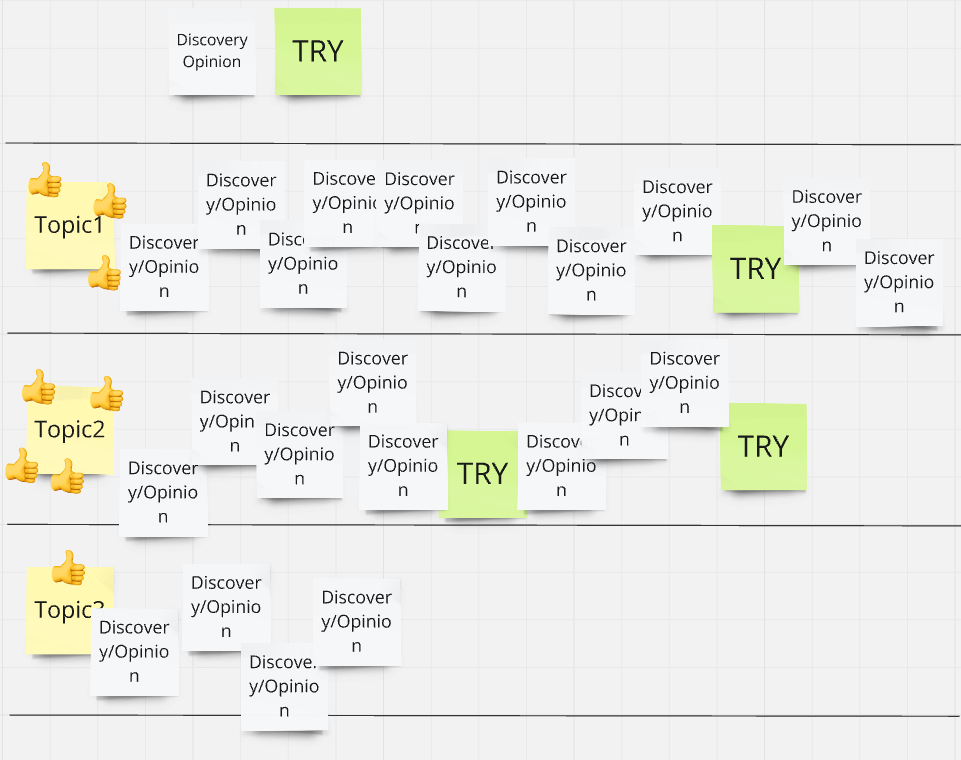
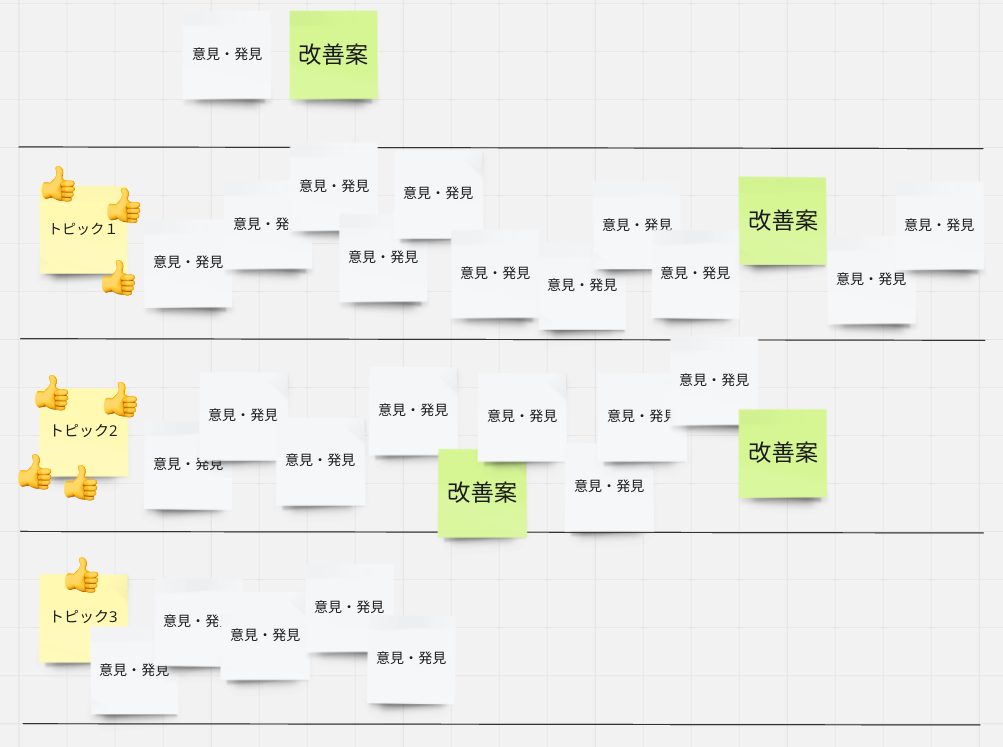
Lean Coffee is a method used to discuss many topics by setting timeboxes. By following the rules below, you can perform analysis and idea generation in a short time.

  1. Divide 10 minutes into three segments of 5 minutes, 3 minutes, and 2 minutes.
  2. At the end of the first 5 minutes, pause the discussion.
  3. If you feel satisfied with the topic, show a 👍; if you still want to discuss, do nothing.
  4. If the majority shows a 👍, move to the next topic; otherwise, continue the discussion.
  5. Do the same for the remaining 3 minutes, and after the final 2 minutes, move to the next topic unconditionally.

By proceeding with the discussion in this way, you can talk about up to 6 topics in 30 minutes, or at least 3 topics. Also, if you come up with 2 TRY ideas for each topic, you'll generate between 6 and 12 TRY seeds from the topics.

As a side note, when conducting Lean Coffee, it's recommended to assign a scribe. By visually tracking the flow of the discussion, it's easier to generate constructive TRYs.

Image of LeanCoffee

Make Decisions - Deciding What to Do

After deepening discussions and generating various TRYs (things we want to try), we finally decide what to implement to improve the team.

Even though TRYs have been raised during the discussion, it doesn't mean that the subsequent improvements have been decided.

We cannot implement all the TRYs that were raised, and the TRYs that came up during the discussion are not necessarily executable as they are.

In this phase, we primarily conduct the following discussions and decisions:

  • Decide which TRYs are most important for the team
  • Refine TRYs to make them executable
  • Assign TRYs to team members
  • Manage the TRYs

By going through this phase, the TRYs become executable as follows:

Refinement on Decision Making
Let's explain each of these.

Decide Which TRYs are Most Important for the Team

Selecting appropriate topics and engaging in active discussions can result in many TRYs. However, it's not realistic to execute all of them.

Trying to implement many TRYs simultaneously can lead the team to face many changes in the next sprint, causing fatigue. In the worst case, the motivation to execute TRYs may gradually decrease, turning the retrospective into just a place to propose improvements without action.

To avoid such situation, I recommend you to utilize tools like dot voting or heat maps to decide which TRYs to implement in the next sprint at the beginning.

Refine TRYs to Make Them Executable

As mentioned earlier, the TRYs generated during discussions may not be directly executable. To make the selected TRYs executable, refine them by clarifying the wording, creating subtasks, and adjusting the scope.

When refining TRYs, it is recommended to compare them with the criteria of SMART goals.

A SMART goal is a commonly used criterion for goal setting, derived from the initials of the following five words:

  • Specific: Clear and specific
  • Measurable: Progress and results can be measured
  • Attainable: Realistically achievable
  • Relevant: Appropriate for solving the problem
  • Time-bound: Has a clear deadline or time frame

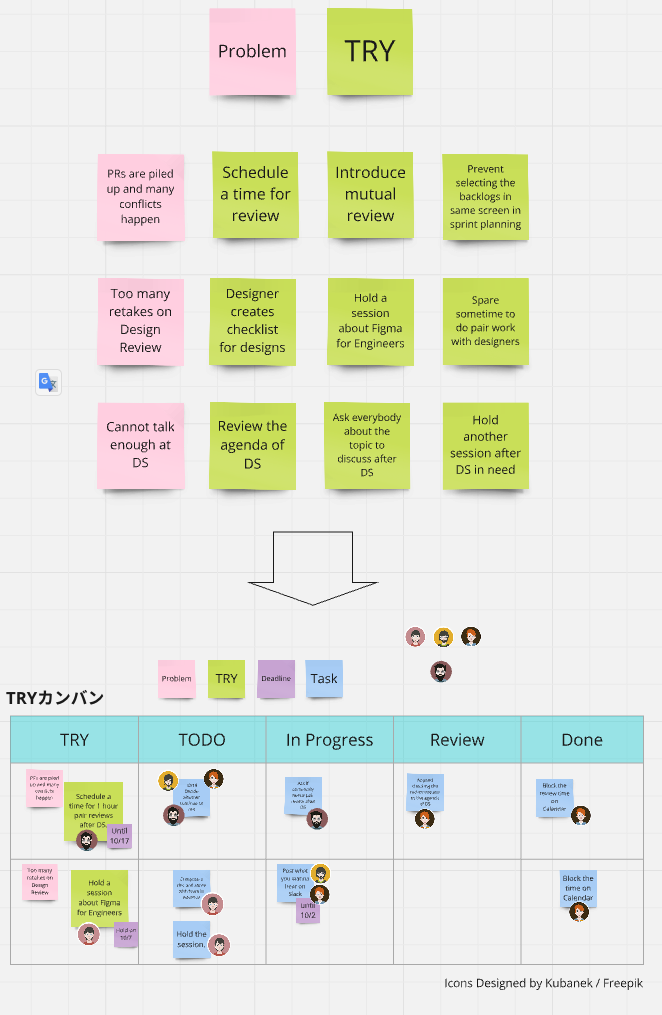
For example, suppose the following problem and TRY have been raised:

Problem: Pull requests are piling up, causing many conflicts

TRY from the discussion: Schedule time for pair reviews

This TRY is not necessarily executable as is. Let's refine it from the perspective of SMART.

  • Specific: The action itself is clear, so no problem here.
  • Measurable: Frequency and duration are not specified, making it hard to measure. For example, adding the words "1 hour daily" would be better.
  • Attainable: Scheduling between reviewers and reviewees is necessary. For instance, creating a subtask to block 1 hour on own calendar after the Daily Scrum (DS) can increase feasibility.
  • Relevant: Securing review time helps prevent PR backlog, so it is appropriate for solving the problem.
  • Time-bound: There's no set deadline. For example, "Continue for two weeks and evaluate the effect in the next retrospective" makes it clear.

By refining the TRY in this way, we get the following specific TRY and tasks:

Problem: Pull requests are piling up, causing many conflicts

Improvement (TRY): For the next two weeks, schedule 1 hour after DS for pair reviews, then discuss whether to continue afterward

Tasks

  • Register the schedule in the calendar
  • Add a pair review request to the end of the DS agenda
  • During each DS, ask if anyone needs a pair review
  • Discuss whether to continue after two weeks

Assign Responsibility

To execute the refined TRYs, the next step is to assign responsibility. Clearly define who is responsible for completing the TRY and who will carry out the created subtasks.

A common issue in retrospectives is that improvement ideas are proposed but end up not being executed.

Deciding who is responsible at this stage is crucial to cultivate a habit of the whole team taking responsibility for improvements and preventing the retrospective from becoming a mere formality.

In a team I previously participated in, we established temporary roles called "〇〇 Police" (e.g., Review Police, Pair Programming Police) to check whether the team's decided improvement plans were being executed and to prompt action.

Having fellow team members gently remind each other made it easier to implement improvement plans without resistance, which I found to be a very effective approach.

Manage the TRYs

This step is not mandatory, but managing TRYs had a significant positive effect on improving team activities.

Even after refining the selected TRYs and assigning responsibility, sometimes the improvement plans decided a week or a month ago get sidelined due to daily tasks.

To avoid such situations and ensure that improvements are executed, I recommend managing TRYs on a Kanban board and checking progress during the Daily Scrum (DS).

Regularly reviewing the progress of TRYs and tasks from the previous sprint to see if team activities are improving was very effective.

Close the Retro - Closing the Retrospective

Once you've decided on the improvements to implement in the upcoming sprints, the final step is to close the retrospective.

In this phase, you record what the team has learned, solidify the improvement plans, and express gratitude to the participants and facilitator.

The main activities are as follows:

  • Reflecting on the content of the retrospective
  • Moving TRYs and tasks to a visible place on the Kanban board (including transcribing them to the TRY Kanban if you're using one)
  • (For offline meetings) Taking photos of whiteboards or sticky notes
  • (For offline meetings) Tidying up the venue
  • Expressing gratitude to the participants and facilitator

I'd like to introduce two activities that I personally enjoy.

Retrospective of the Retrospective

While a retrospective is an activity to improve team practices, the retrospective itself is also subject to improvement. By reflecting on the retrospective at the end, you can conduct future retrospectives even more efficiently and effectively.

In a Retrospective of the Retrospective, each member writes down what went well and areas for improvement at the end.

By candidly sharing feedback such as "I couldn't express what I wanted to say," "There were moments when the discussion stalled," or "The connection between phases was weak," you can apply these insights to the design of the next retrospective.

Circle of Gratitude

This activity is particularly effective in quarterly retrospectives. It's also very effective in overall retrospectives held at the end of a project or release.

The method is very simple: participants take turns expressing gratitude to the team and each member.

Procedure:

  1. The first person expresses gratitude to the team and to someone (or everyone) in the team.
  2. The person who just spoke nominates the next person, who then expresses gratitude to each member in the same way. (You can nominate someone who you expressed gratitude in step 1.)
  3. Once the last person has finished expressing gratitude, declare the completion of the retrospective.

Retrospectives are held to conduct continuous improvement, and by concluding with expressions of gratitude to your colleagues, you can start the next sprint on a positive note. This also leaves a positive impression of the retrospective itself and the overall improvement activities.

Conclusion

This post has become quite lengthy, but that concludes the discussion on the concept of designing retrospectives.

Retrospectives are one of the representative Scrum events, and I believe they are often conducted in a way where people "just try doing it without really understanding it."

Since the goal of Scrum is to increase product value through continuous hypothesis testing and improvement, the focus tends to shift towards improving the product or service itself, such as backlogs and sprint reviews.

However, at the same time, the core of Scrum is the team, and improving the quality of the team ultimately leads to the quality of the product.

If this article has piqued your interest in retrospectives, I encourage you to take this opportunity to design the retrospective event anew.

Additionally, if you'd like to discuss or ask questions about this article, or if you'd like me to design and facilitate a retrospective for your team, please feel free to contact me at the email address below.

Email: munchkins.hands@gmail.com

Lastly, as mentioned at the beginning, I wrote this article intending to for the proposal, so I really appreciate if you can put a like to my proposal.

confengine.comk

Thank you for reading to the end.

References

The Five Phases of a Successful Retrospective

Are you an Elite DevOps performer? Find out with the Four Keys Project

Lean Coffee Retrospective

Agile Retrospectives, Second Edition: A Practical Guide for Catalyzing Team Learning and Improvement (This is link to Amazon, but not for promotion or affiliates.)

上手に振り返る。チームがもっと強くなる。 ~レトロスペクティブを設計するという考え方~

English version is available here =>

The Better You Reflect Yourself, More Stronger Your Team Will Be - The Concept of Designing Retrospective - - Junks, GC cannot sweep

はじめに

ご無沙汰しています。

最初に近況報告ですが、コロナ禍でエストニア行きは中止となりました。。。

現在はフィンランドのデザインファームの日本支社でコンサルタントをしています。

同僚の技術力の高さやアジャイルへの造詣の深さに加え、社内にスクラムトレイナーがマンツーマンでコーチングしてくれることもあって、もうすぐ勤めて4年が経とうとしています。

現職でのいくつかのプロジェクトを経て、僕としてもかなりアジャイルやスクラムへの造詣も深くなったので、RSGT 2025へのプロポーザルを送ってみようかと考えています。

この記事もプロポーザルに使用する目的で書いているので、もしよろしければプロポーザルへのいいねにご協力ください。

confengine.com

さて、久しぶりの技術記事ですし、せっかくなので今回は、僕がスクラムトレイナーと一番よく議論するレトロスペクティブに関して記事を書きたいと思います。
他社で務める後輩と飲んでる際に、この記事で書かれている内容に関して説明したところ、お金払っても良いからもっと詳しく教えて欲しいというような評価をもらったので、それなりに楽しんでいただけるのではないかと思います。

目次

レトロの質はチームの質、ひいてはプロダクトの質につながる

この記事を読んでいる皆さんは、きちんとレトロスペクティブを行っていますか?
スクラムを実践している開発者にこの質問をすると、「毎スプリントきちんとやっている」「隔週だが時間をしっかりとっている」と返ってくることが多いです。
しかし、実際に何をしているかを聞くと、KPTを書いて発表するだけ、というケースがよく見られます。

レトロスペクティブは、スクラムの三つの柱である『透明性』『検査』『適応』のうち、 『検査』を担う活動であり、適応のための準備をする活動でもあります。
この『検査』の質は、直接チーム、ひいてはプロダクトの質に直結します。
そのため、ただKPTを書いて発表して終わるだけでは、少し不十分かもしれません。

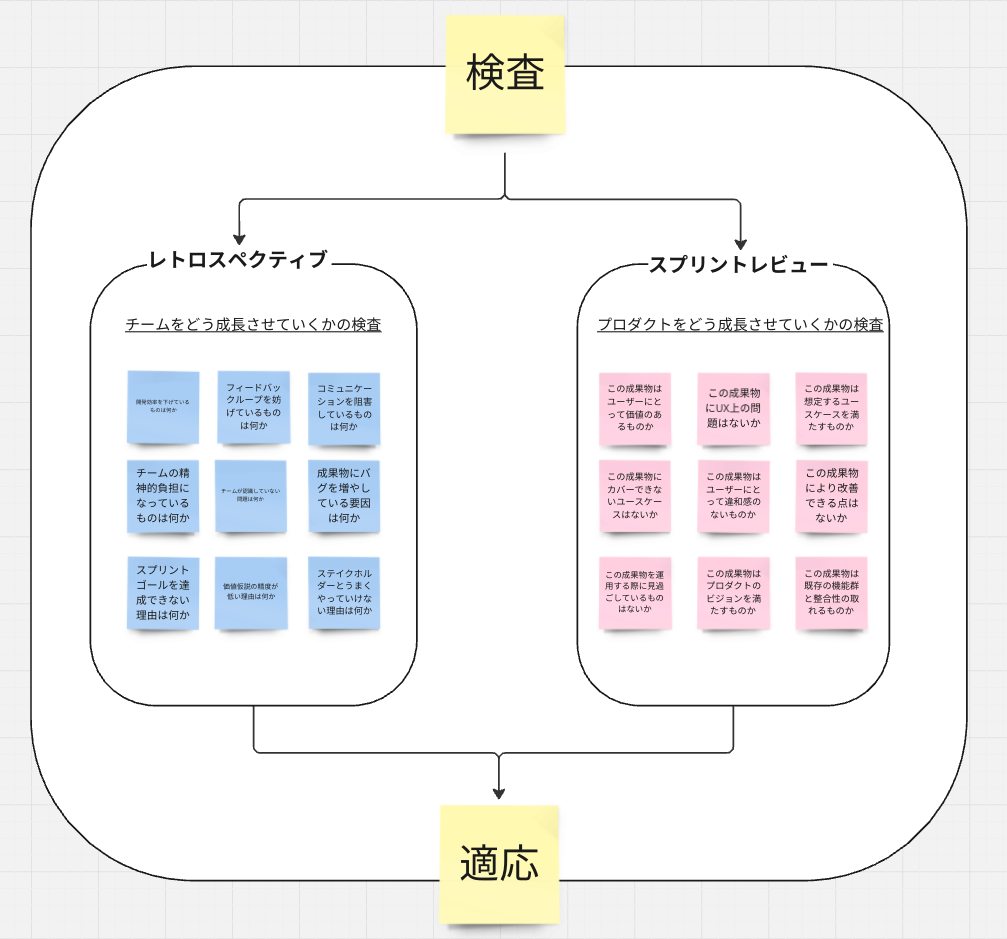
スクラムには代表的な検査イベントとして、スプリントレビューもあります。
スプリントレビューはプロダクトへの検査であり、プロダクトをどう向上させていくかを担います。
一方、レトロスペクティブはチーム活動への検査であり、チーム活動の質をどう向上させていくかを担っています。

思いつく限りで、代表的な検査の観点を図にまとめてみました。

スプリントレビューとレトロスペクティブの違い

こうして見ると、それぞれのイベントには非常に多くのトピックがあり、少し話しただけでは改善できないことがわかると思います。
これらのトピックについて効率よく議論し、実際にチーム活動を向上させる改善サイクルを回していくためには、各イベントをしっかりと設計し、チームを議論に導く必要があります。

今回はスプリントレビューには触れませんが、イベントや会議を設計するという考え方はさまざまな場面で役立ちますので、もし興味があれば参考にしてみてください。

レトロスペクティブを設計する

レトロスペクティブを設計するとはどういうことでしょうか。
レトロも含め、ほとんどの会議には目的があります。
アイデア出し、情報共有、目の前の問題への対応策の決定など、目的はさまざまです。

そして、レトロの参加者たちがその目的にスムーズに辿り着けるかどうかは、アジェンダとファシリテーションの質に大きく左右されます。

どのような運びで議事進行を行うか、どんな方法で議論を行うのか、発散させるのか収束させるのか、どのように結論づけるのか、といった要素が重要です。

そういった観点から、参加者を目的により効率的かつ適切に導くためのアジェンダと議論の方法を考えることが、レトロスペクティブを設計するという考え方になります。

フェーズとツール

レトロの設計を始めるにあたって、レトロをフェーズアクティビティという視点から見てみましょう。

フェーズとは、言葉の通り議論の段階のことです。
設計段階では、議論を進めるにあたり、どのような段階を踏めば効率よく結論に辿り着けるかを考えます。
例えば、共有・発散・分析・意思決定という四つのフェーズがあったとすると、発散と分析は一回ずつで良いのか、意思決定は必要なのか、それぞれにどの程度の時間を使うのかなどを検討します。
レトロにも目的はありますが、それぞれのフェーズにも目的があり、フェーズの目的を達成するために使用されるツールが次に説明するアクティビティになります。

アクティビティとは、それぞれのフェーズでどのような議論の方法を用いるかです。
例えば、冒頭に出てきたKPTも議論を行う方法としてのアクティビティの一つです。
他にも、『帆船のレトロ』『5 Whys』『ブレインストーミング』『Good/Bad/Ugly』などのアクティビティは馴染みのある方も多いのではないでしょうか?
それぞれのアクティビティには得意なこと苦手なことがあり、チームの状況や議論のフェーズ、所要時間に合わせて組み合わせを考える必要があります。
各フェーズごとに適切なアクティビティを組み合わせることで、より効率的に議論を進めることができます。

このように、レトロのタイムボックスやチームの状況を分析し、議論の段階(フェーズ)と議論の方法(アクティビティ)の組み合わせを考えることが、レトロスペクティブを設計するにあたっての基本になります。

また、この考え方は普段の会議でも使用することができますので、レトロに限らずワークショップやプレゼンテーションなど、さまざまな場面で必要に応じて使ってみてください。

なお、これらのアクティビティは手札の多さや成熟度によって設計の質が大きく変わります。
アクティビティをあまり知らない、やり方がわからないという場合には、ぜひ参考文献の章にある『アジャイルレトロスペクティブズ 強いチームを育てる「ふりかえり」の手引き』を読んでみてください。
非常に多くのツールが紹介されています。

レトロスペクティブの5つのフェーズ

さて、いきなりレトロスペクティブを設計しなさいと言われても、何から始めれば良いかわからないかもしれません。
ご安心ください。スクラムのレトロスペクティブには、一般的に使われる「5つのフェーズ」というフレームワークがあります。

これは、レトロスペクティブの時間を5つのフェーズに分割し、それぞれにアクティビティを組み合わせて結論に導くという考え方です。

以下に、その5つのフェーズを簡単にまとめます。括弧内は、1時間のレトロスペクティブを設計する場合の時間配分の目安です。

  1. Set the Stage - 場を設定する(5分以内)
  2. Collect the Data - データを集める(10分程度)
  3. Generate Insights - データを分析する(30分程度)
  4. Make Decisions - 何をするか決める(10分程度)
  5. Close the Retro - レトロを閉会する(5分以内)

レトロ進行のイメージ

このフレームワークでは、議論の準備をし、議論の種を集め、集めたトピックについて議論し、何をするかを決定し、今後に向けて動き出すという流れを作ります。

それでは、それぞれのフェーズについて説明します。

Set the Stage - 場を設定する

このフェーズでは、参加者全員が安心して議論できる準備を行います。

参加者全員が議論に参加できることが重要です。しかし、残念なレトロスペクティブでは、一部の主張が強い方がずっと話していたり、最初に発言する機会を逃した人が最後まで黙ったままになることがあります。

このフェーズは、参加者全員に「これから議論に参加する」「この場で発言して良い」という意識を持ってもらい、そのためのルールを制定・確認する場です。

全員が議論に参加し、チームとしての進む方向を決める場で意見を述べることは、多くの視点を集めるだけでなく、レトロスペクティブで決まった改善案を実行する際の当事者意識にもつながります。

このフェーズは軽視されがちですが、開始が遅れるなどでよほど時間が押していない限り、必ず行うようにしてください。

さて、このフェーズで何を行うかは、チームの成熟度に大きく依存します。
チームの成熟度に合わせて、二つのアクティビティを紹介します。

チェックイン

例えば、チームの心理的安全性が高く、各メンバーが活発に意見を言い合える場合は、何か一言発言してもらうだけでも構いません。
本来のチェックインはレトロに集中してもらうために行うので、レトロに期待することや今の自分の状況を言ってもらうことがルールですが、別にそれにこだわる必要はありません。
「今週のスプリントに関する感想を一言で!」「今の気分を20文字で!」「今日のお昼ご飯に食べたものとその感想を一言で!」などで十分です。
これは質問の答えを知りたいわけでも、仲良しごっこをしたいわけでもなく、「これから声を出すぞ」「自分の意見を発言するぞ」という雰囲気を作るための準備体操のようなものです。

意味がないように感じるかもしれませんが、このアクティビティの有無で議論の活発さは大きく変わります。
たとえバカバカしく感じても、必ず行うようにしてください。

実際に私の所属する会社では、この「感情の輪」の上に自分の名前を置いて、その理由を一人一言で話すというアクティビティをよく最初に行います。

感情の輪
画像引用:File:Plutchiks-emotional-wheel.png - Wikimedia Commonsより。

チームの約束

一方、一部の主張が強い方がずっと話してしまうようなチームの場合、議論のルール決めや確認から始めます。

具体的なルールとしては、「全員が話す量が同じになるようお互いに気を遣う」「誰かが話しているときは遮らず最後まで聞く」「話に入りづらいと感じたらサインを出す」「1分以上続けて話す場合は他のメンバーに意見や質問がないか確認する」「ファシリテーターが指名した人の話す機会を奪わない」などが考えられます。

これらのルールは、ファシリテーターやスクラムマスターが決めても良いですが、一度レトロスペクティブの時間を使って話し合っても良いかもしれません。

チームとして決めた約束事であれば、つい話したくなってしまうメンバーも、あまり話すのが得意でないメンバーも、それぞれが納得しながら議論に参加できるようになります。
また、役職の高いメンバーがいる場合、事前にその方に発言の頻度や強さを少し抑えてもらうようお願いしておくのも有効です。

Collect the Data - データを集める

参加者全員が話す準備ができたら、次に議論するための種を集めます。

データというと、消化したストーリーポイントや稼働日数、PR数などの定量的なものをイメージするかもしれませんが、ここでいうデータには感情や意見、出来事などの定性的なものも含まれます。

KPTを貼り出すこともデータ収集活動の一つです。KPTはデータ収集から意思決定までを一貫して行うツールですが、この時点ではTRYは「やったほうがいいと思うこと」程度の扱いにしておいた方がいいでしょう。

具体的なデータとしては以下のようなものが挙げられます。

定量的なデータと取得するためのツール

  • 消化したストーリーポイントの推移:Jiraなど
  • 開発活動のリードタイム(※1):Findy Teamsなど
  • 4 Keysの値(※2):Jira、Findy Teamsなど
  • 実効稼働時間(※3):カンバン上のチームカレンダーやグループウェアなど

※1 着手からデザイン作成、デザイン完了から開発着手、開発着手からPR作成、PR作成からマージ、マージからデプロイなど
※2 デプロイ頻度、変更のリードタイム、変更障害率、サービス復元時間
※3 スプリント内の合計稼働時間のうち、休暇やミーティング、スクラムイベントなどを除いた時間

定性的なデータと代表的なアクティビティ

  • チーム活動内容へのフィードバック:Keep/Problem/Tryなど
  • チームの状況へのフィードバック:Good/Bad/Ugly、帆船のレトロなど
  • スプリント内の出来事:タイムラインなど
  • メンバーの感情的フィードバック:Mad/Sad/Gladなど

もちろん、これらすべてのデータを集めるのは現実的ではありませんし、多すぎる情報はノイズになります。どのようなデータをどのように集めるかは、スクラムマスターやチームメンバーが何を話したいかを事前に確認し、ファシリテーターが決めてください。

また、一点押さえておきたいのは、レトロスペクティブで最も重要なのはこの後に続く議論と分析だということです。したがって、データ収集の時間を抑えるために、データを自動で収集するツールを使ったり、日々の活動の中でKPTを集めるのは非常に有効な手段です。

実際にスクラムトレーナーとのメンタリングミーティングの中でも繰り返し指摘され、日常的にタイムラインと感情・活動フィードバックを集めるためのボードを作成しました。

メンタリングミーティングで作成したオリジナルのフィードバックボード

また、私が参加したチームでは、Found and Resolvedという、チーム全体で話したいことを気づいた段階で設置するスペースも用意していました。

Generate Insight - データを分析する

次はデータ分析のフェーズです。データ収集の最後でも触れましたが、このフェーズはレトロスペクティブの核と言っても過言ではありません。チームメンバー全員の知恵を結集して、収集した課題の分析と解決策の模索を行います。

議論するトピックを選ぶ

データ分析フェーズを始めるにあたって、まず最初に行うべきことは、議論する課題の選出です。各メンバーはそれぞれの課題感を抱えており、データ収集ではさまざまなトピックが出てきます。

しかし、議論できる時間も改善に充てられる時間も限られているため、どの問題を解決するか、あるいはどの良い点をさらに伸ばすか、議論の対象を絞る必要があります。

おすすめのトピックの絞り方として、ドットボーティングヒートマップがあります。

ドットボーティング

ドットボーティングはよく使われる手法なので、ご存知の方も多いかと思いますが、一応解説します。

ドットボーティングでは、一人あたりの投票数(例:3票)を決め、データ収集で集めたトピックの中で議論したいものに投票します。持ち票を絞るのは、各メンバーに優先順位付けを行ってもらうためです。

最も多く投票を集めたトピックが、チームとして関心が高い内容となり、改善した際のインパクトも大きくなります。ドットボーティングは短時間で行える上、シンプルで分かりやすいという利点があります。

ただし、注意点として、ドットボーティングを行う際は、色や記名などで誰が投票したかが分からないようにする必要があります。

投票者が分かると、チーム内のパワーバランスや気遣いで投票が偏る可能性があります。チームメンバー全員がフラットに議論するトピックを選出するためにも、同じ色の無記名のドットを使用しましょう。

ヒートマップ

個人的にドットボーティングよりおすすめなのがヒートマップです。ドットボーティングの拡張版で、データ収集で集めたトピックの中から、議論したいものに決められた数以下の好きな数のドットを投票します。ドットの数はそのトピックへの関心度を表し、例えば最大3票の場合、以下のような意味付けをします。

  • 1票:興味がある
  • 2票:話したい
  • 3票:とても話したい

投票後、ドットボーティングと同様にドットの数を集計し、最も投票数の多いものから順に議論を始めます。

ヒートマップの良いところは、各メンバーの意志の強さが反映される点にあります。ドットボーティングでは、それほど興味がないトピックにも票が入ることがありますが、ヒートマップでは興味の度合いが票数に影響します。ヒートマップを行うことで、あまり共感が得られていないが特定のメンバーにとって非常に重要なトピックにもスポットライトが当たり、一部のメンバーしか気づいていない問題も議論の対象として選ぶことができます。

議論を深める

議論する対象が絞れたら、次は議論に移ります。選ばれたトピックに対して意見や知恵を出し合い、試してみたいこと・やってみたいことを共有します。

議論は結論が出るまで自由に行っても良いですが、フィッシュボーン図を使ったり、5 Whysリーンコーヒーを活用することで、より効率的に進めることができます。

私自身、1on1や通常の会議でもリーンコーヒーをよく使うので、ここではリーンコーヒーについて解説します。

リーンコーヒー

リーンコーヒーは、タイムボックスを設定して多くのトピックを議論するための手法です。以下のようなルールで、短時間で分析とアイデア出しを行います。

  1. 10分間を5分・3分・2分の3つに区切る。
  2. 最初の5分が終わった段階で議論を一旦止める。
  3. そのトピックについて満足した場合は👍のサインを出し、まだ話したい場合は何も出さない。
  4. 過半数が👍を出した場合は次のトピックへ、そうでない場合は議論を継続する。
  5. 残りの3分でも同様に行い、最後の2分が終わったら無条件で次のトピックへ移る。

この方法で議論を進めることで、30分で最大6トピック、最低でも3トピックについて話すことができます。また、それぞれのトピックでTRYのアイデアが2つずつ出れば、6個のトピックから12個のTRYの種が生まれます。

余談ですが、リーンコーヒーを行う際には書記を設けることをおすすめします。議論の流れを視覚的に追えるようにすることで、建設的なTRYを生み出しやすくなります。

リーンコーヒーのイメージ

Make Decisions - 何をするか決める

議論を深め、さまざまなTRY(試してみたいこと)が出たら、最後にチームを良くするために何を実行するかを決定します。

議論の中でTRYが出たからといって、この後の改善内容が決まったわけではありません。上がったすべてのTRYを実行することはできませんし、議論の中で出てきたTRYが必ずしも実行可能なものとは限りません

このフェーズでは、主に以下のような議論と意思決定を行います。

  • どのTRYがチームにとって最も重要かを決定する
  • TRYを実行可能なものに磨き上げる
  • TRYのアサイン(担当者)を決める
  • TRYを管理する

このフェーズを経ることで、TRYは以下のように実行可能なものになります。

Make DecisionsのBefore/After

それぞれについて説明していきます。

どのTRYがチームにとって最も重要かを決定する

適切なトピックを選択し、活発な議論が行われると、多くのTRYが出てくることがあります。しかし、そのすべてを実行することは現実的ではありません。

多数のTRYを同時に進めようとすると、次のスプリントでチームは多くの変化に直面し、疲弊してしまいます。最悪の場合、TRYを実行しようという意欲が徐々に減少し、レトロスペクティブが改善案を出すだけの場になってしまう可能性もあります。

このフェーズの最初には、ドット投票やヒートマップなどを活用して、どのTRYを次のスプリントで行うかを決定しましょう。

TRYを実行可能なものに磨き上げる

冒頭でも述べたように、議論の中で生まれたTRYは、そのままでは実行に移せない場合があります。選んだTRYを実行可能なものにするために、わかりやすく文言を修正したり、サブタスクを作成したり、スコープを調整したりして磨き上げます。

TRYを磨き上げる際には、SMART目標という基準に照らし合わせることをお勧めします。

SMARTな目標とは、目標設定でよく使用される基準で、以下の5つの単語の頭文字を取ったものです。

  • Specific(具体的):明確で具体的である
  • Measurable(計測可能):進捗や成果が測定できる
  • Attainable(達成可能):現実的に達成可能である
  • Relevant(関連性がある):問題解決に適切である
  • Time-bound(期限がある):明確な期限や時期が設定されている

例えば、以下のような問題とTRYが上がっていたとします。

問題:PRが溜まってしまい、コンフリクトが多数発生している

議論の中で出たTRY:レビューの時間を決めてペアレビューを行う

このTRYはそのままでは実行可能とは言えません。SMARTの観点から磨き上げてみましょう。

  • Specific(具体的):やること自体は明確なので問題ありません。
  • Measurable(計測可能):頻度や時間が明記されていないため、計測が難しいです。例えば「毎日1時間」と明記すると良いでしょう。
  • Attainable(達成可能):レビュワーとレビュイーのスケジュール調整が必要です。例えば、デイリースクラム(DS)の後に1時間ブロックするなどのサブタスクを作成すると、実現可能性が高まります。
  • Relevant(関連性がある):レビュー時間を確保することでPRの滞留を防ぐため、問題解決に適しています。
  • Time-bound(期限がある):期限が設定されていません。例えば、「2週間継続し、効果をレトロで評価する」とすると明確になります。

このようにTRYを磨き上げることで、以下のような具体的なTRYとタスクが生まれます。

問題:PRが溜まってしまい、コンフリクトが多数発生している

改善策(TRY):次の2週間、DS後に1時間ペアレビューの時間を設定し、その後継続するかを議論する

タスク

  • カレンダーに予定を登録する
  • DSのアジェンダの最後にペアレビュー依頼を追加する
  • 毎日のDSでペアレビューが必要な人がいないか声掛けする
  • 2週間後に継続の是非を話し合う

アサインを決める

磨き上げたTRYを実行するために、次にアサイン(担当者)を決めます。誰がそのTRYを完遂する責任を持つのか作成したサブタスクを誰が行うのかを明確にしましょう。

一般的なレトロスペクティブでありがちなのが、改善案は出たものの、実行されずに終わってしまうことです。この段階で責任者を決めておくことは、チーム全体で責任を持って改善に取り組む習慣をつけ、レトロスペクティブを形骸化させないためにも非常に重要です。

以前参加していたチームでは、「〇〇警察」(e.g. レビュー警察・ペアプロ警察)という一時的な役割を設け、チームが決めた改善案が実行されているかをチェックしたり、声掛けを行ったりしていました。身近なメンバーが声掛けをしてくれることで、抵抗なく自然に改善案を実行できるため、非常に有効な取り組みだと感じました。

TRYを管理する

この項目は必須ではありませんが、TRYを管理することでチーム活動の改善に大きな効果がありました。

選んだTRYを磨き上げ、アサインを決めても、日々のタスクに追われて一週間前や一ヶ月前に決めた改善案が流れてしまうことがあります。

このような事態を避け、確実に改善を実行するために、レトロスペクティブで出たTRYをカンバンで管理し、デイリースクラム(DS)で進捗確認を行うことをお勧めします。毎日、前スプリントのTRYとタスクの進捗状況を確認し、チーム活動の改善が進んでいるかをチェックすることは非常に有効でした。

Close the Retro - レトロを閉会する

次のスプリント以降にどのような改善を行うかが決まったら、最後にレトロを閉会します。

このフェーズでは、チームが学んだことを記録し、改善案を定着させ、参加者やファシリテーターに感謝を述べます。

主に行うことは以下のとおりです。

  • レトロ内容の振り返り
  • カンバンの見える場所にTRYやタスクを移す(TRYカンバンを使っているならそこに転記することも含む)
  • (オフラインの場合)ホワイトボードや付箋の写真を撮る
  • (オフラインの場合)会場の片付けを行う
  • 参加者やファシリテーターに感謝を伝える

個人的に好きなアクティビティを二つ紹介します。

レトロのレトロ

レトロスペクティブはチーム活動の改善活動ですが、レトロ自体も改善の対象です。レトロの最後にレトロ自体の振り返りを行うことで、次回以降さらに効率的・効果的にレトロを行うことができます。

「レトロのレトロ」では、最後に各メンバーから良かった点や改善点を書き出してもらいます。

例えば、「言いたいことがなかなか言えなかった」「議論が停滞してしまうことがあった」「フェーズ間の関連性が弱かった」などのフィードバックを率直に伝えてもらうことで、次回のレトロ設計に活かすことができます。

感謝の輪

このアクティビティは、四半期に一回のレトロで特に有効です。また、プロジェクトやリリースの最後に行う全体レトロでも非常に効果的です。

方法は非常にシンプルで、順番にチームと各メンバーに感謝を伝えてもらうだけです。

手順:

  1. 最初の人がチームとチームの誰か(もしくは全員)に対して感謝を述べる。
  2. 感謝を述べた人が次の人を指名し、その人が同様に各メンバーに感謝を述べる。(ステップ1で感謝を述べたメンバーを指名しても構いません。)
  3. 最後の人が感謝を述べ終わったら、レトロの完了を宣言する。

レトロスペクティブは継続的な改善を行うために開催されますが、一緒に働くメンバーに対して感謝を述べて締めくくることで、次のスプリントをポジティブに始めることができます。また、レトロ自体や改善活動全体の印象もポジティブになります。

まとめ

かなり長くなってしまいましたが、以上がレトロスペクティブをデザインするという考え方についてでした。

レトロスペクティブは代表的なスクラムイベントの一つであり、「よくわからないけどとりあえずやってみる」という形で行われがちなアクティビティだと思います。

スクラムのゴールは継続的な仮説検証と改善を通じてプロダクトの価値を上げていくことなので、どうしても焦点はバックログやスプリントレビューなど、プロダクトやサービスそのものの改善に向きがちです。

しかし、同時にスクラムの主体はチームであり、チームの質の向上はひいてはプロダクトの質につながります。

もしこの記事でレトロに興味を持っていただけた方がいたら、ぜひ今一度レトロスペクティブというイベントを設計してみてください。

最後になりますが、冒頭で書いた通り、この記事はRSGT2025へのプロポーザルのために作成しました。
もしいい記事だなと思ってくださった方がいらっしゃいましたら、プロポーザルへのいいねをお願いします🙏
confengine.com

また、この記事に関して相談したい・質問したい、また自分のチームで一度設計とファシリテーションをして欲しいなどがありましたら、以下のメールアドレスまでぜひご連絡ください。

メール:munchkins.hands@gmail.com

最後までお読みいただきありがとうございました。

参考文献

The Five Phases of a Successful Retrospective

Are you an Elite DevOps performer? Find out with the Four Keys Project

リーンコーヒー実践ガイド:アジャイルチーム向け

アジャイルレトロスペクティブズ 強いチームを育てる「ふりかえり」の手引き (Amazonへのリンクですが、アフィリエイトではありません)

なぜ僕たちはサーバレスでJavaを諦めTypescriptを採用したか

この記事はエストニアのタリンから書いています。
期間に大小あれど、すでに日本・ベトナム・中国・台湾・シンガポール(・オフショアでインドとも)の現地で仕事し、すでにアジアでの労働は満喫した感があるので、ヨーロッパにそろそろ足を伸ばそうかなと。

そこで、第一候補として、大学生の頃から憧れだったIT先進国エストニアに下見に来ています。

まぁ、現地の開発者と何人か話して、もうほぼ心は決まりましたね。半年くらいを目処にこちらに移住しようかと考えています!
幸運にも日本人は比較的簡単に労働許可が得られるようなので、夏くらいを目処に今の会社を退職し、こちらに来ようと考えています。

これについては今後別に記事を書きます。いく前の期待といった後の感想とか、結構需要がある気がするので。

ところで、現地の開発者と話しているうちに、技術モチベが高まりに高まってしまったので、久々に何か記事を書いてみようかなとか考えて、この記事を書くことに決めました。
記事書いてるなら読みたいと言われたので、PR目的もかねて先に英語版を公開したのですが、日本語でも描きたいなぁと思ってしこしこ日本語訳しました。
[元記事]: Why we replaced Java with Typescript for Serverless in dev.to

テーマはなぜ僕たちがサーバレスプロジェクトでJavaを諦めてTypescriptを採用したかについてです。

はじめに

サーバレス(serverless)は昨今もっとも注目を集める設計手法の一つで、おそらく多くの開発者が大なり小なり自分のプロダクトに応用し始めているのではないでしょうか?

僕自身、完全にサーバレスに魅せられてしまい、昔ながらの自分でサーバやミドルウェアを管理しながら運用するみたいな世界には戻れる気がしません。

そもそもスケーリングや分散可能性をきちんと考えて設計されたアプリケーションであれば、旧来のサーバーアプリケーションの機能から受けられる恩恵も比較的少なくなりますし、サーバレスに切り替えるデメリットはそこまでありません。

最近は設計に関して相談された時は、必ずサーバレスの話題を出してみることにしています。

さて、サーバレスは既存の開発手法とは大きく異なるため、今持っている知識を刷新し、既存の手法や技術スタックを見直しながら開発していく必要があります。

見直しというからには、開発基盤として何の言語を使うかも、当然ながら見直さなくてはいけない技術スタックの対象になります。

タイトルにある通り、最終的に僕たちはTypescriptを採用し、およそ一年半開発・メンテナンスを行ってきました。
そして一年半経った今、あくまで個人的な感想ではありますが、Typescriptは僕たちが期待した以上に成果を出してくれました。

そこでこの記事では、以前使用していた言語にどんな問題があったのか、そしてなぜTypescriptに切り替えたことでどんな恩恵があったのかをこの記事では解説していきたいと思います。

なぜJavaを諦めなくてはならなかったのか

さて、なぜTypescriptを採用したかについて話す前に、まずなぜ以前使用していた非常に強力な言語であるJavaを諦めなくてはいけなかったかについてお話ししたいと思います。


NOTE

先に述べておきますが、僕は結構なJava好きです。なんなら初めて触った言語もJavaでした。
JVMに関してもそれなりに勉強して、その神がかったランタイムの仕組みにかなり感銘を受けています。(てか多分作ったやつは神)
なので、どこかの大学生のようにJavaがクソだとかレガシーだとか使い物にならんとか、この記事でそういうことを言うつもりは一切ありません。
また、そういったコメントもあまり嬉しくないです。あくまでサーバレスという仕組みにJavaがあまり合わなかっただけなので。
その点だけはご了承いただければ幸いです。


さて、本題に戻りましょう。

僕たちのサービスでは、サーバサイドはサービス設立当時から基本的にJavaだけで書かれていました。
当然ながらすでにJavaには多くの利点があり、特に

  • プラットフォームフリー
  • よくできたJITコンパイル
  • やばいGC
  • よく構成された文法
  • 静的型付け
  • 関数型サポート(最近は特に)
  • 多様なライブラリ
  • 信頼できるコミュニティ(Oracleではなく、開発者の方)

などなど挙げればきりがありません。

しかし、AWS Lambda上でコードを試していて気づいたのですが、Javaはあまりサーバレスに向かないことがわかりました。

理由としては以下のことが挙げられます。

  • JVMの起動オーバーヘッドが大きい
  • Springフレームワークを使用してるとさらにエグくなる
  • 最終的なパッケージアーカイブがでかすぎる(でかいのは100MB以上)
  • 関数が増えてくるとWebフレームワークなしでリクエストを捌くのがきつくなる
  • コンテナは30分程度しか走らないため、G1GCやJITなどのJavaの利点が生かせない
  • Lambdaは基本的にEC2上に建てられたAmazon Linuxのコンテナで動くため、プラットフォームフリーは関係ない。 (欠点ではないけど)

上述の点は全てなかなかに厄介ですが、今回は特に厄介だった問題についてもう少し書いてみたいと思います。

Cold Startがまじで厄介

一番厄介だったのは、圧倒的にCold Startのオーバーヘッドです。おそらく多くの開発者の方々もこいつに悩まされているのではないかと思います。。。

僕たちはコンピューティング基盤としてAWS Lambdaを使っていたのですが、AWS Lambdaはユーザからのリクエストが来るたびに新しいコンテナを立ち上げます。

一度立ち上がってしまえば、しばらくは同じコンテナインスタンスを再利用してくれるのですが、初回起動時にはJavaのランタイムに加え、フレームワークで利用されるDIコンテナやWebコンテナなども全て初期化する必要があります。

さらに言えば、一つのコンテナで処理できるのはあくまで一つのリクエストのみで、複数のリクエストを処理することはできません。(内部で数百のリクエストスレッドをプーリングしてたとしても同じです。)

つまりどういうことかというと、もし複数のユーザがリクエストを同時に送ってきた場合、Lambdaは起動中のコンテナの他に、別のコンテナを起動しなくてはいけなくなるということです。
通常、僕たちはどの時間に具体的に何軒のリクエストが同時に来るかを事前に予測することはできません。
つまり、何らかの仕組みを作ったとしても、事前に全てのLambdaをhot standbyさせることはできないのです。

これは必然的にユーザに数秒から10秒以上の待機時間を強制し、ユーザビリティを著しく下げることにつながります。

こんな感じでCold Startがえげつない事を理解した僕らは、これまでの数年かけて書かれた技術スタックを捨てて、 他の言語を選択することを決めました。

なぜTypescriptを選んだのか

めちゃくちゃ恥ずかしい話なのですが、正直Lambdaでサポートされている全ての言語をきちんと精査・比較して決めたわけではないのです。 ただ、正直な話、状況的にTypescript以外の選択肢はなかったのです。

まず第一に、動的型付け言語は外しました。長期に渡ってスキルのバラバラな開発者によって保守・メンテ。拡張されるコードなので、動的型付けはあまり使いたくありません。

したがって、PythonRubyに関してはかなり序盤で選択肢から外れました。

C#Goに関しても、現在ほとんどのチームがJavaをメインに開発しているサービスなので、既存言語とあまりかけ離れた言語を使うと新規開発者のジョインが難しくなると判断し、今回は見送られました。

もちろん、昨今この二大言語は非常に注目度が高く、特にGolangに関しては徐々にシェアを伸ばしつつあるのは知っています。

しかし、急いでサーバレスに開発を移す必要があったため、僕たち自身のキャッチアップの時間も考慮し、見送らざるを得なかった感じでした。

Typescriptの利点

という事で、僕たちはTypescriptを使い始めたわけです。
Typescriptの利点を挙げるとしたらこんな感じでしょうか?

  • 静的型付け
  • 小さいパッケージアーカイブ
  • ほぼ0秒の起動オーバーヘッド
  • Javaとjavascriptの知識が再利用できる
  • NodeJSのライブラリやコミュニティが使える
  • javascriptと比べても関数型プログラミングがしやすい
  • ClassとInterfaceにより構造化されたコードが描きやすい

長期に渡って運用・開発が行われるプロジェクトにおいて静的型付け言語がどれだけ大きな恩恵を与えるかは今更語るまでもありませんので、ここには書きません。
ここでは主に、Typescriptのどういった点がサーバレス開発によく馴染んだかについて書いていきたいと思います。 静的型付け以外にもTypescriptを使う利点は非常に大きく、

小さいパッケージと小さい起動オーバーヘッド

おそらくサーバレスでTypescriptを使う利点という観点からいうとこれが一番大事だった気がします。(なにせ他のメリットはほぼTypescript自体のメリットなので・・・)

先ほど触れた通り、JavaはJVM本体やフレームワークが利用するDI/Webコンテナなどの起動にかかるオーバヘッドが非常に大きいです。 加えて、Javaの性質上、AWS Lambdaで流すには以下の Additionally, as the nature of Java, it has the following weak point to be used in the AWS Lambda.

マルチスレッドとそれを取り巻くエコシステム

マルチスレッドは非常に強力な機能であり、事実として僕たちはこの機能のおかげで多くのパフォーマンス問題を解決してきました。
JVM自体もガーベージコレクションやJITコンパイルにおいて、デフォルトでにマルチスレッドを活用してあの素晴らしいランタイムを実現してます。
(詳しくはG1GCJIT Compileを参照)

しかし、起動時間単体で見ると、アプリケーションに使用する全てのスレッドを立て終わるまでに、100ミリ秒から数秒かかっていることがわかります。
この機能自体は旧来のいわゆるクラサバモデルでEC2上で動くアプリケーションならほぼ無視できるオーバーヘッドですが、LambdaなどのFaaS上で動くサーバレスアプリケーションでは決して無視できません。

Typescriptはnodejsベースであり、基本的にシングルスレッドです。非同期は別スレッドや別プロセスではなくあくまでジョブキュー、イベントループなどで管理されます。

したがって、ほとんどのライブラリやフレームワークは起動時にスレッド展開をする必要はありませんし、ランタイムを起動するためのオーバーヘッドもほとんどかかりません。

巨大なパッケージアーカイブ

サーバレスにおいてソースコードのパッケージアーカイブは、基本的に小さいに越したことはありません

Lambdaのコンテナは起動時、AWSにより管理されたソースコード用のS3バケットからソースをダウンロードし、コンテナに展開します。

S3からのダウンロード時間は通常非常に短時間ですが、100MBや200MBとなると無視はできません。

NodeJsのパッケージは基本的にJavaに比べて小さくなります。

正直なんでそうなるかに関しては不勉強でわかっていないのですが、以下の理由が関係してるんじゃないかなと思ったりします。(もしこれやでっていうのをご存知の方はコメントで教えてください)

  • Javaのフレームワークやライブラリは包括的なものも多く、本来使いたい機能に必要ない依存性を引き込んで来るが、javascriptは目的特化のライブラリが多く、必要最低限に依存を抑えられることが多い。
  • Javascript(nodejs)は1ファイルに複数のmoduleを書くことができ、それでいてメンテもしやすいが、Javaにおけるメンテナンス性の重要なポイントはファイル分割とパッケージ管理のためソースが肥大化しやすい。

実際Javaで書いていた時は最大で200MB以上のパッケージができることもあったのですが、nodejsに変えてからは35MB程度で済んでいます。

この巨大なパッケージアーカイブは、僕たちがSpringで書かれた旧来のコードを再利用しようとしたのが大きな原因なのですが、実際これらのいらないフレームワークを除いて最適化したコードでも、どうしても50MBは必要になってしまいました。

Javascriptの知識やエコシステムを利用できる

僕たちもWeb開発者のため、基本的にフロントエンドも書きます。したがって、ある程度のjavascriptやnodejsに関する知識は蓄えていました。

Jquery全盛時代からReact/Vueのようなモダンフレームワークでの開発までを通じて、言語的な特徴はある程度抑えていましたし、どうやって書けばいいコードになるかもある程度理解してるつもりです。

Typescriptはjavascriptの拡張言語であり、最終的にはjavascriptにトランスパイルされます。

多くの文法やイディオムはjavascriptから受け継がれているので、実際それほど準備期間を要さずにサービス開発を始められました。

加えて、ほとんどのメジャなNodeJSのライブラリはTypescriptに必要な型定義を提供しているので、NodeJSのエコシステムのメリットをそのまま享受できたのも非常に嬉しいポイントでした。

関数型の実装が非常にしやすい

昨今の技術トレンドを語る上で、関数型の台頭はなくして語ることはできません。
関数型の実装はその性質上、シンプルでテスト可能で危険性の低い安定したコードを書くのに大きく寄与します。

特にAWS Lambdaの場合、常に状態を外部化するコードが求められるため、状態や副作用を隔離する関数型の実装は非常に相性が良く、メンテもしやすくなります。

そもそも、jqueryの生みの親であるJohn ResigがJavaScriptニンジャの極意で語ったように、javascriptはそもそも関数型のプログラミングをある程度サポートしています。
javascriptにおいて関数は関数は第1級オブジェクトであり、jqueryも実は関数型で書かれることを期待して作られています。

しかし一方で、動的型付け言語で関数型のコードを書こうとすると、時折非常にめんどくさい事になることがあります。
例えば、プリミティブ型だけで表現できる関数は非常に限られますし、返り値や引数にObjectを取るのは普通に結構危険です。

しかしtypescriptでは引数や返り値に型を指定することができます。

加えて、以下のTypescriptの機能は、僕たちの達の書く関数の表現の幅を広げ、より安全でシンプルなコードを書くのに寄与してくれます。

  • Type: 共通に使用される型をコンテクストに合わせて型付けできる。(stringUserIdPromiseResponseなど)
  • Interface/Class: Objectで表現されるの引数や返り値をコンテクストにあった型で表現できる。
  • Enum: よもや語る必要もあるまい
  • Readonly: 自分で作成した型をImmutableに出来る
  • Generics: 関数のインターフェイスの表現の幅が広がる

Typescriptは他にも関数型で書こうとした時に非常に便利な機能をいろいろ備えていますが、全てをここであげることはしません。(っていうか、結構javascript由来のものが多い)

関数型とTypescriptに関する記事は今後どこかで書いていきたいなと思っています。

Javaで学んだBest Practiceを再利用できる

typescriptの文法を学ぶと、かなりJavaやScalaに似通った記述ができることに驚きます。

僕たちはそもそも、それなりの期間をJavaで開発してくる中で、Javaにおけるいいコードのお作法をある程度蓄積してきました。
ClassやInterfaceをどう設計すべきか、enumはどう使うと効率的か、Stream APIはどう書くと保守性が上がるかなど、蓄積してきたノウハウはそれなりに捨てがたいものがありました。

Typescriptはインターフェイスやクラスに加えて、アクセスモディファイアやreadonly(Javaでいうfinalのプロパティ)をサポートしており、僕たちは割とさらっとJavaで育んだノウハウをそのまま導入することができました。

これにはオブジェクト指向的なベストプラクティスやデザインパターンなども含まれます。
(関数指向とオブジェクト指向は二律背反ではないので、プロジェクト内で同時に使用されても問題ないと考えています。個人的には。)

もし僕たちがやや文法が独特なPythonやRubyを採用していたとしたら、より品質の高いコードを書くためのプラクティスをどうこの言語に応用すべきかに多くの時間を費やすこになったことかと思います。(それも楽しいんですよ、知ってます、ただ時間がね。。。。)

当然ながら全ての設計やロジックをコピペしたわけではないですし、むしろ大半のコードを書き直ししました。
ただ、おおよその部分をスクラッチで書き直した割に、それなりの品質でそれなりの短期間で書き直しが終わったんだよということは特筆しておくべきかと思います。

結論

僕たちもまだまだTypescriptに関しては初心者といっていいレベルでまだまだ勉強が必要ですが、すでにそのメリットは全力で享受しておりいます。

今聞かれれば、Golangもいいなあとか、MicronautとGraalVMとかも面白そうだなあとか、もっと他の選択肢もあったかもなあとか考えたりもするのですが、現状Typescriptには非常に満足しており、最善の選択肢の一つではないかと信じています。

もちろん、処理遅いけどバッチ処理どうすんねんとか、並行処理とか分散処理同すんねんとか、、ワークフロウどう設計すんねんとか、API Gatewayのタイムアウトどうハンドルするねんとか、データの一貫性どう担保すんねんとか、サーバレスやTypescriptに起因する問題にはたくさんぶち当たりました。

ただ、それはそれでギークとして非常に楽しく取り組んできて、すでにいくつかのこれが今の所best practiceじゃね?っていう方法もいくつか見つけました。(これはのちのち記事にしていきたい。)

もし今Javaでサーバレスに取り組んでいて、サーバレスくそやん、きついやん、やっぱ普通にサーバ欲しいわってなっている方がいたら、ぜひTypescriptも試してみてください。想像する以上に生産性出るんじゃないかなぁって期待してます。

長文おつきあいいただきありがとうございました。何かコメントや訂正があればぜひお願いします。

Why we replaced Java with Typescript for Serverless

I’m writing this article in Tallinn, Estonia.

Since I've already worked a lot in Asian countries such as Japan, China, Vietnam, Singapore, and Taiwan, I feel like moving to other regions such as Europe.

As the first candidate, now I am coming to Estonia, where the IT industry takes place in the center of the whole country, to see how the working environment is.
After talking with several developers in local, my mind has been almost determined. With a 90% possibility, I will move here within this year.
Fortunately, the Japanese can relatively easily obtain working permission in this country. Probably gonna be here again by this Summer.

Btw, after talking with the developers here, I feel a kinda motivation for IT more than before and decided to write this article.
The theme is the reason why we started to use the Typescript for our serverless application.

NOTE
Since this is related to our business application, I do not write all the things happened to our project in detail and some backgrounds are manipulated.
However, I believe that the tech-related parts are all the fact and I tried to write as precisely as possible.
I hope this article will help you gain some knowledge and solve your problem on serverless shift.
If there is some misunderstanding in this article, please feel free to give me a comment. Will fix it immediately after self-verifications.

Introduction

Serverless is one of the most modern and highlighted software architecture and recently more and more developers are starting to using it in their own application or services.

I also am loving it a lot now and I cannot think of getting back to the self-managed server model anymore.
Basically, if your application is well designed for scaling and distributing, most of the feature we rely on the server application has lost its benefit, I believe.
So these days, I always encourage serverless if soebody asks me about the architecture or designs of web service.

Btw, since it is a totally different approach from the traditional development method, Serverless requires us to refresh our knowledge and review the tech stacks we've been using.

What language we should use also is one of the things we need to review.
Finally, we started to use *Typescript and have been working with it for more than 1 and a half years.
And, as just a personal opinion impression though, it was much nicer than we expected it to be.

So I would like to write what was a problem with the old tech stack and what was good after switching it to Typescript.

Why we needed to give up Java

Before talking about the reason for choosing the Typescript. I would like to explain the reason why we gave up the previous tech stacks with one of the most excellent languages, Java.

**NOTE**

In the first place, I'm an enthusiastic Java lover and my mother tongue also in Java. (Java 4 or 5, when there was no generics feature.)  
I have studied about the JVM and was inspired a lot from it as well. I guess it was made by god.  
So here I do not mean to despise or insult Java at all.  
Any comments or complaints about Java are not welcomed, just it didn't work well with serverless at the moment.  

Ok, sorry, let's go ahead.

We’ve been using Java as the primary language for our service for a long time and we actually know that Java has a lot of advantages like

  • Platform-Free
  • Well designed JIT compile
  • Excellent GC
  • Well-structured grammar
  • Type strong
  • Supports functional programming recently
  • Having a lot of libraries
  • Trustable communities.(Not Oracle, but developers community)

and etc..
We really appreciated it and rely on them a lot.
However, when we tested our code with serverless, we found that Java is not too good to be running on the FaaS service such as AWS Lambda.

The reasons are the following.

  • The overhead to launch the JVM is not ignorable.
  • Moreover, our primary framework Spring took more time for launching containers.
  • The final package of source code is relatively large. (Sometimes more than 100MB)
  • Hard to proxy the requests without using web framework when the number of functions increased
  • G1GC or JIT compile not works well since the container stops very shortly
  • Can not enjoy the benefit of the platform free since it always running on EC2 with Amazon Linux image. (Not cons, but just reduced the reason to use Java)

All the problems listed above were so annoying, but here I wanna explain the most troublesome one of the above.

Cold Start of Lambda is too troublesome

The most troublesome thing we faced at first was the overhead of the cold start. Yeah, I guess most of the serverless developers may have faced the same issue.

We used AWS Lambda for computing and AWS Lambda launches the container every time a request comes from users.
Once it is launched, it reuses the same container instance for a while, but in the initial launch, it needs to launch the Java Runtime environment and all the necessary web container or environments of frameworks.

Additionally, one container can be used to handle just a single request and cannot be used for multiple requests concurrently even though your application is ready with hundreds of request threads in your thread pool. It means that when several users send the request to the endpoint at the same time, AWS Lambda needs to launch another Lambda container to handle the other requests.

It was so troublesome actually since normally we cannot estimate the number of concurrent requests and hot standby mechanism doesn't work. (even if we make it somehow.) Eventually, it will force users to wait for several seconds to open the page or process the request and we were sure that it will surely degrade the user experience.

After seeing how the cold start is annoying, though we’ve already had a lot of codes written in the past several years, finally, we gave them up all and switched to use another language.

Why we chose Typescript

Actually, it is a bit shameful though, we’ve decided to use the Typescript from a really early phase without deep thought or comparison with other languages.
However, honestly, we have no choice of using other languages supported by Lambda from the beginning other than Typescript under that circumstance.

At first, we have no choice to use dynamic typing languages. The service and code are supposed to be running, supported, maintained and extended for a long time by variously skilled developers. So we would not like to use the dynamic typing languages for serverside.

Thus, Python and Ruby were out of options.

C# and Go have a totally different character from the language we (and other teams) were working on and it may take some time for other newbies to catch up.
Of course, we all were aware that these days those 2 languages, especially Golang is winning the share gradually thanks to its nature.
However, the arch change was a too immediate mission and we didn’t have much time to catch it up for ourselves as well. Thus, though those 2 languages were fascinating for us, we gave up using those langs.

Benefits of using the Typescript

So finally, we have decided to use Typescript.
The benefits of Typescript are as the following.

  • Type Strong
  • Much small size package
  • Super fast launch overhead
  • Able to reuse the knowledge of javascript and Java
  • Node libraries and communities are awesome
  • Suitable for functional programming even compared with the javascript
  • Able to write well-structured codes with Class and interface

As everybody knows, static typing is quite an important factor for the long-running project like B2B so I do not write much about it here. Here I wanna explain how the Typescript worked well with. With other features of the typescript, the type really works well more than we expected.

Less overhead to launch with small packages

Probably this is the most important factor to switch from java to Typescript in serverless. (Other benefits are almost about the benefit of using the Typescript itself)

As mentioned in the previous part, Java has overhead to launch the JVM and DI/Web container for the framework.
Additionally, as the nature of Java, it has the following weak point to be used in the AWS Lambda.
Typescript doesn't have those weak points and it resolved our concerns.

Multithreading and its eco-system

Multithreading is a powerful functionality of Java and it really helps us implement the high-performance codes.
Even the JVM itself is using it for the garbage collections to provide great performing runtime.
(See G1GC or JIT Compile)

However, you will find it takes from 100s milliseconds to several seconds to prepare for all the thread used in the container.
It is small enough and ignorable for the ordinal architecture like client-server running on EC2, but totally not ignorable for serverless applications which is running on the FaaS like Lambda.

Typescript is based on the nodejs and it only supports single thread by default. (Async or Sync is just controlled by call stack, not by thread)
Thus, the time to launch it is much short than Java with modern frameworks.

Big Package Archive

In serverless, normally, a small-sized package is preferred.

When the lambda container is launched, the container downloads the source code from the AWS managed source bucket in S3.
Time to download the S3 is normally small, but not ignorable if it is 100MB or 200MB.

With nodejs, the code size of a package could be relatively small compared with Java.

Honestly, I am not too sure why it is even now, but probably for the following reasons. (Please teach me in a comment if you know more.)

  • Java frameworks are usually comprehensive and can contain a lot of dependent libraries to cover everything, but javascript framework or libraries are more like on-the-spot and doesn't contain unnecessary files so much.
  • Javascript can write multiple modules or functions in one file and can maintain it with less effort, but Java requires to design the classes and interfaces with multiple files to write maintainable and well-structured code.

Actually, when using Java, the packaged jar was nearly 200MB at the biggest.
However, with using the nodejs, it could be reduced to 35MB+ at last.

It was partly because we tried to reuse the Spring Tech stack in the previous arch.
However, even after removing the unnecessary dependency and optimization, a package for one function still required 50MB.

Able to use the knowledge and eco-system of javascript

As we have been working on the web service, we have some kinda stacks of knowledge about javascript and nodejs.

Through the era of Jquery to the modern javascript like React or Vue, we’ve already learned the pros and cons of it and have obtained some know-how to write good code in javascript.

Typescript is a kinda extensive language of javascript and will be transpiled into javascript at last.
Therefore, many of the idiom or grammar is extended from the javascript and we could easily start to write the code without many preparations.

Additionally, most of the useful libraries are providing its type definition for the typescript so that we were able to enjoy the benefit of nodejs eco-system as well.

Works well with the functional programming paradigm

Functional programming is quite an important paradigm when we are talking about the tech trend these days.
It will let you write simple, testable, less-dangerous and stable codes with its nature.

AWS Lambda always requires us to get rid of the state from our code. Functional programming is requiring us to isolate the side effect or state from the functions and this idea surely is making our codes for Lambda more maintainable.

Basically, as John Resig told in Secrets of the JavaScript Ninja, javascript is supporting functional programming from the beginning.
It treats the Function as the first-class object and jquery also were supposed to be written in a functional way as well.

However, plain javascript is a dynamic typing and it sometimes introduces some difficulties to write good functions.
The variety of functions we can express with a single primitive type is quite limited and using the Object type for the arguments/return value is sometimes troublesome.

With typescript, we can specify the type of arguments or return value.

Additionally, following functionalities lets you write the code more safe, simple and expressive.

  • Type: Lets you distinguish the common type and its aspects such as string and UserId or Promise and Either.
  • Interface/Class: Lets you organize the sets of the arguments/return type as suitable for the context in the service.
  • Enum: No explanation necessary I guess.
  • Readonly: Lets you make your objects immutable.
  • Generics: Lets your functional interfaces be more expressive.

Typescript has more advantages for the functional programming, but do not mention them here all. (Partly because it's the advantage of javascript rather than Typescript..)
Please try it and enjoy your discoveries.

Able to reuse the best practice we used in Java

Once you see the tutorial of the typescript, you would find it is quite similar to the Java or Scala.

We’ve been trained how to write good code in Java through our long journey with them to some extent.
We were aware of how we should design the classes and interfaces, how to use enum efficiently, how to make the stream API maintainable in Java and it was not the thing we can throw away instantly.

Thanks to the similarity of Typescript and Java, we could easily take the previous practices over to the new codebase.
Typescript supports the interfaces, classes, access modifier, and readonly properties(equivalent to the final of property in Java) and It actually helped us a lot to reuse the best practices we learned in Java including Object-oriented programming practices and the Design Patterns. (FP and OOP are not antinomy and can be used in the same project, I believe. )

If we would have chosen Python or Ruby, probably we needed to struggle again to find how to apply the practices into the new language for a long time,
(Actually, of course, I know it’s a lot of fun, but not for the time in hurry arch change)

Of course, we didn’t do the copy-paste of the logics in the existing java classes.
However, even though we re-wrote them with 80% from scratch, it didn’t take much time to write it again with acceptable quality.

Conclusion

We are still new in the journey of Typescript and needing a lot to learn, but already found a lot of benefits of it and we really are enjoying it.

If asked now, probably using the Golang can be an option, using the Micronauts with GraalVM also can be an option or maybe there can be more options we can choose. However, I am really satisfied with the typescript so far and believe it is one of the best options we can choose in serverless.

Of course, already have faced some difficulties with Typescript and serverless like how to do the batch processing with relatively slow language, how to do the concurrent computing or distributed processing, how to make the workflow, how to overcome the timeout of API Gateway or how to ensure the data consistencies.

However, all those things are the most interesting things for us, geeks, to resolve.
Actually, we already have found some practices and have overcome them. I will write it in the near future.

If you are struggling with Java on serverless and losing hope for serverless, I strongly suggest you consider Typescript. I can promise that it will work better than you expect it to be.

Thanks for reading through this long article. I am happy to receive your comment or contact if any.

Exceptionをもみ消すなってどうせえちゅうねんって話

QiitaのJavaアドベントカレンダー14日目になります。

若干時間オーバーです、ごめんなさい、時差的にこちらではセーフなので許してください。 うそやんけ、僕の担当14日でした。 今日15日・・・圧倒的遅刻・・・・ごめんなさい!!!!

そういえば、最近開発者コミュニティに入りました。 初学者が多めのコミュニティのようですが、それでも勉強になることが多く、参加してよかったなと感じています。

主にSlackで活動しているようです。

海外からでも参加できるため、非常にありがたいです。 僕は現地語がまだ喋れないので、現地の開発者コミュニティにはまだ参加できていないんですよね。。。。

さて、というわけで、今回は初学者向けのエラーハンドリングの記事を書いていきたいと思います。

基本的にはJavaで書かれていますが、他の言語でも参考になることはあるかと思いますので、初学者でもみ消すなに手をコマネいている方はぜひ読んでみてください。

そもそも揉み消しとは

仕事でコードを書き始めた人は、先輩やマネージャから「Exceptionをもみ消すな」という言葉を聞いたことがあるかと思います。
具体的に言うと、こんな感じのコード。

static void momikeshiTheException(SomeObject input) {  
  try {  
    someIoOperation(input);  
  } catch (IOException e) {  
    e.printStackTrace();  
  }  
}  

ひどい場合だとこう。

static void momikeshiTheException(SomeObject input) {  
  try {  
    someIoOperation(input);  
  } catch (IOException e) {}  
}  

初学者のうちはExceptionの扱い方がわからずこういったコードを書いてしまいがちです。
なんなら、僕も学生の頃はよく書いてました。

このコードには以下のような問題があります。

  • エラーが発生した事実が呼び出し元に通知されないため、呼び出し元は成功したものとして処理を続けてしまう。
  • エラーの詳細が記載されていないため、デバッグが困難になる

初学者や自習で学んでる人たちには、現場でどんな不都合が起きるかイメージしづらい部分があるかもしれないので、具体的なケースを挙げてみる。

だらだら長いので、読みたくない方は飛ばしてください笑

簡単に説明すると、レストランの発注システムでExceptionがもみ消されたせいで、季節限定メニューのオーダーが厨房に届かずキャンペーンが失敗して、そのデバッグに受注したフリーランスの私が苦しむ話です。

コスタリカブルーの悲劇

喫茶店コスタリカブルーでは、2015年の開店以来、ずっと手書きの伝票を使っていた。

しかし、スマホ決済が徐々にメジャとなってきていること、また来年には新たに支店を開設することを鑑み、2019年の夏から注文・決済・記帳フローの自動化に踏み切った。

友人のつてで紹介されたフリーランサーによって作成したアプリでは、スマホで注文を受けを受けることができ、注文内容はキッチンとレジスターに送られる。

会計は現金もしくは任意のスマホ決済で行え、それぞれの会計内容は帳簿に自動で記帳される。

夏に導入してから半年、初期のバイトの子たちへの講習に手間取った以外に大きな問題はなく、システムは概ね好調に稼働しているように思われた。

しかし、10月に入り事態は一変した。

コスタリカブルーでは、10月に入り、ハロウィンにあやかり、ハロウィンランチセットの提供を始めた。

ハロウィンランチを注文した顧客は、パスタ・サンドウィッチ・ロコモコのうちからメインを1品を選ぶことができる。

事前の試食会での反応は上々で、料理長をはじめとするスタッフ一同は、それなりの手応えを感じていた。

しかし、彼らの期待に反し、ハロウィンランチセットの提供初日、店内は大混乱した。

ハロウィンランチセットのオーダーがキッチンに届かないのである。

正確には、パスタセットは届くのだが、サンドウィッチとロコモコが届かない。

厨房スタッフは何も知らないまま来たものを順番に作り、フロアのスタッフは何か遅いなと思いつつも提供を続けた。

20分後。あるテーブルからクレームが入る。

四人のグループ席で注文したハロウィンセットのうち、ロコモコとサンドウィッチを頼んだ三人の分がまだ来ていないと言う。

残ったパスタを頼んだ一人も、食べずに残りの三人の分を待っていたようで、すでにパスタの表面は乾き始めている。

フロアスタッフは厨房に駆け込み、いつ出来上がるかと厨房スタッフに尋ねるが、厨房スタッフはそんなオーダーは入っていないという。

何かがおかしい。

フロアスタッフはシェフに伝票を見せ、急ぎでロコモコとサンドウィッチを作り始めてもらうよう頼み、お客様の待つテーブルに戻る。

しかし、四人組は今から作るならもういらないと、怒りながら店を後にしてしまった。

それもそのはずである。
コスタリカブルーのランチタイムのメインターゲットはオフィスレディたちであり、少ない昼休憩を使ってコスタリカブルーでランチを取ってくれている。

時間になればオフィスに帰り仕事に戻らなくてはいけない彼女たちに取って、今から作り直すなど、10分とて待つのは難しいのである。

また、このやりとりを見ていた周りの客たちも口々にハロウィンセットのオーダーをキャンセルし、店を後にした。

システムが故障しているらしいと察したフロアのスタッフは、持っていたペンとメモ帳でオーダーを続けたが、すでにランチタイムは終了間近。
結局初日のランチセットは売り上げがほぼないまま終了してしまった。

その夜、連絡を受けたオーナーはフリーランサーに連絡し、翌日までにバグの修正をするよう依頼した。

フリーランサーは深夜の連絡に気を滅入らせながらlogを確認した。
エラーログにはいくつかスタックトレースが出力されていたが、どれも時間が記載されておらず、また問題が起きたクラスの行と名前以外何もわからない。

会計未終了通知サービスクラス。これは違うだろう。
帳簿の勘定項目のDaoクラス。これは毎月月末にバックグラウンドで深夜に走るバッチで使うクラスだ、違うだろう。

……(2時間後)

オーダーの備考マスターのDaoクラス。
もしかしてこれか?

オーナーに連絡し、DBの閲覧許可をもらい、オーダーの備考マスタを確認する。

無い。

ハロウィンランチセットの厨房への注文票に追加で出力される備考マスターに何もデータがないのだ。

備考マスタはハロウィンセットのような1つのメニューに複数の選択肢がある場合に使われるマスターだ。

幸か不幸か、これまでコスタリカブルーはそのようなセットを設けてこなかった。
したがって、このテーブルを利用される機会がなく、半年間このバグに遭遇することがなかったのだ。

このマスタが存在しないと言うことは、備考登録時に何らかのバグが発生し、登録が完了しなかったに違いない。

さらに過去のログを見る。
時刻はすでに二時を回っている。

……2時間後
見つけた。備考マスタを登録するときに、ClassCastExceptionが吐かれている。

しかし、何がcastされているんだ…

例外はわかった。しかし、Inputがわからない以上、ソースを追うしかない。
時刻は午前4時。明日の仕事には確実に響くだろう。

結局、1時間にわたるデバッグの結果、テーブルに保存するEntityクラスのプロパティのenumが、きちんとvalueに変換せずそのままDBにinsertされていたため、enumのordinalで保存しようとしていたのが原因だった。

修正は非常に簡単なため、30分で修正を終え、テスト後デプロイし直した。

時刻はすでに6時。彼は睡眠を諦め、レッドブルを買いにコンビニへ向かうことにした。

ではどのように例外を取り扱えばいいか

さて、上記のような悲劇を避けるために我々はどのようにExceptionを扱えばいいのでしょうか。

そもそも論でいうと、実はこのエラーハンドリングが商用プログラムを書く上で最も重要になってくる箇所であり、このエラーハンドリングをいかに上手くやるかが腕の見せ所だったりします。

この記事では、僕が経験的に例外はこう言う風に扱うといいよと言う例をいくつか提示していこうと思います。

鉄則と言うか絶対やらなきゃいけないこと

例外が発生した場合、開発者が絶対にやらなくてはいけないことがあります。

具体的にいうと次の二つ。

  • エラーの内容を、いつ、どんな状況で、何の入力に対して例外が発生したかをlogに出力する
  • エラーが発生したことを呼び出し元のクラスやユーザーに対して通知する。

この2つのうち、2番目に関してはこの後、順番に例示していきますが、1つ目に関しては非常に明快です。

すぐできます。

ほとんどの言語にはloggerを提供するライブラリが存在するため、そういったライブラリを用いてlogを出力していきます。

Loggerライブラリは様々ありますが、基本的にはプロジェクトの標準で使っているloggerライブラリを使えば問題ないかと思います。

オレオレで自分の好きなライブラリを勝手に使い出すと別の意味で怒られます。

他の人のコードなどを参考に何が使われているか調べましょう。

System.out.printlnやconsole.logが標準ならそのプロエジェクとはもうダメだ。転職を考えよう。

logに何を出力するか

さて、冗談はさておき。。

そういったライブラリは、基本的に発生時間と発生クラスをプリントし、また発生した例外を引数に加えることでスタックトレースを出力してくれます。
したがって、あとはメッセージにinput内容と、何をしようとした時に起きたかを書けば最低限何かが起こっても対応出来ます。

例えばこんな感じ。

static void momikesanaiTheException(SomeObject input) {  
  try {  
    someIoOperation(input);  
  } catch (IOException e) {  
    log.error("Exception occurred while calling the someIoOperation with the input {}", input, e);  
  }  
}  

inputに関しては必要に応じてマスクしたり、プロパティを絞ったりする必要があるが、何の入力に対してエラーが発生したかを記述しておくことは、圧倒的にdebugコストを下げます。
したがって、パスワードや個人情報などには留意した上で、inputも出来るだけ詳細に出力するように心がけるべきです。

もっと言うなら、影響範囲や起こりうる障害、対応方法なども書いておくと、将来別の開発者の手にメンテが渡った時に役立ちます。
これに関してQiitaで自作のライブラリを作ったって言う超良記事があったのだけど、いつの間にかストックから消えていたので、知ってる人がいたらコメント欄に書いてもらえるととっても嬉しい、です。

Loggingに関していえば、それだけで僕でも2、3記事書けるくらい実は奥深いコンテンツなので、今回はいったんこの程度でまとめさせていただきます。

logの出力に関する注意

初学者向けの記事につき、一応注意喚起しておきます。
商用含め、自分以外に公開されるのプログラムでは、ユーザの個人情報やパスワード、クレジットカード情報など、logに出力してはいけない情報が山ほどあります。

ちなみに、Facebookですらやらかしてます。
参考: Facebookが数億人のパスワードを平文で保存していたと認める

こういった情報は必ずマスクするか、出力から外すようにしましょう。

Javaでは、Objectをloggerや標準出力に渡すと、instanceをtoStringした値を出力します。

したがって、toStringを適切に実装してやることが非常に重要です。
lombokであれば@ToString.Excludeをプロパティにつけてやることで、toStringの対象から外すことができます。

気づけば当たり前のことなので、logを出力する際には、注意して実装してください。

また、出力していいかわからないときは、上司やクライアントに必ず確認をとるようにしてください。

あ、パスワードとかクレジットカード情報とかは、上司やクライアントがいいっていってもダメです。

呼び出し元に通知する方法

さて、ここからは、呼び出し元のクラスやユーザに対して失敗した事実を通知する方法に関して書いていきます。

僕が一番使っている期間が長いことや、Javaアドベントカレンダーの記事であることを鑑みて、今回はJavaでかかせていただいております。

他の言語の方には申し訳ありません。。(´・ω・`)

後半にいくにつれて実装難易度(って言っても大したことないけど)が上がっていくように書こうと思っています。現時点では。

また、それぞれの実装方法に僕の独断と偏見で以下のようなランクづけをしました。

この基準が役に立つかは知らないし、状況や実装ロジックによって安全性や実用性は変わるので何とも言えません。

ただ、なんとなく実装の安全さや実用性に関してイメージを掴んでもらえたらいいなと言う意味でつけています。

  • 実装難易度:
    実装の難易度や工数など。高いほど言語に対する理解が必要になり、書かなくてはいけない行数も増える。
  • 実用性:
    実際の現場でどの程度使われるか。難しい実装でも、そこまでする必要はないとか、逆に簡単な実装でもそれでは不十分と判断されることも多いため。
  • 安全性:
    呼び出し元に、プログラム的な意味でどれだけ正確な情報を伝えられるか。正確な情報を呼び出し元に伝えることで呼び出し元はより柔軟に呼び出しの失敗に対応できる。

1: booleanで結果を返す

実装難易度: ★
実用性: ★★
安全性: ★

説明

1つ目は、成功した場合trueを、失敗した場合falseを返すと言う実装です。
非常に簡単で、今この瞬間からもできるので、複雑な実装をしている時間がないと言う場合は、最低限このくらいはするように実装して欲しい。

static boolean momikesanaiTheException(SomeObject input) {  
  try {  
    someIoOperation(input);  
    return true;  
  } catch (IOException e) {  
    log.error("Exception occurred while calling the someIoOperation with the input {}", input, e);  
    return false;  
  }  
}  

このような実装にすることで、最低限、失敗した場合falseが帰ってくることで、呼び出し元のクラスは失敗した場合の処理を流すことができます。

この実装は呼び出し元に失敗の原因が通達されていないため、若干心もとないですが、失敗する条件が明確な時はこれでも十分かと思います。
例えば、JavaのSetのaddなどは、すでに同じ要素がCollectionに存在する時falseを返しますね。

いつ使うべきか

基本的にはあまりおすすめはしませんが、以下のようなケースでは使えるかと思います。

  • 他の開発者もしくはかつての自分が実装したもみ消しを発見してしまい、急ぎ挙動を修正する必要がある場合
  • シンプルかつアトミックなことが自明な場合。

2: Optionalで包んで結果を返す。

実装難易度: ★★
実用性: ★★
安全性: ★

解説

これもほぼbooleanと同じですが、booleanより使える箇所がやや限られます。
Optionalは、詳しくは他の記事を漁って欲しいのだけど、ある操作に対して要素が存在するかしないか不定の時に使われます。
したがって、Optionalで返していいのは、例えば指定したIDやKeyに対して要素が存在しない時に例外が投げられるケースが基本です。
例えば、FileNotFoundExceptionやNoSuchElementExceptionなどはoptionalで包んで返してもいいと思います。

static Optional<FileReader> momikesanaiTheException(SomeObject input) {  
  try {  
    return Optional.of(new FileReader(new File(input.getTargetPath())));  
  } catch (FileNotFoundException e) {  
    log.error("File not found to the path {}", input.getTargetPath(), e);  
    return Optional.empty();  
  }  
}  

実装の手間がbooleanとそう変わらないのに実装難易度を高めにつけたのは、 このOptionalを使っていいかと言う判断が多少経験を要するからです。

いつ使うべきか

正直、上の解説を書いててエラーハンドリングでOptional使うのは微妙かなと思い始めたのですが、以下のSOの記事で条件付きでですが、そこそこ支持されていたので、一応書いてみます。
参考: Can I use std::optional for error handling?

  • IOを伴う操作で指定したリソースが存在しない、もしくは取得できない可能性がある場合
  • 例外を投げたくない場合

なお、後述のEither型の方がより正確に呼び出し元に何が起きたかを伝えられるため、個人的にはEither型をオススメしています。

3: 別の例外を実装し、投げられた例外を包んで呼び出し元に投げる

実装難易度: ★★★
実用性: ★★
安全性: ★★★

解説

ロジックの中で呼び出したメソッドが非チェック例外(※1)を投げる場合、チェック例外(※2)などに包んで返すのも1つの手段です。
呼び出し元にExceptionのハンドリングを委託し、自分のロジック内でのハンドリングを諦めるパターンです。

この場合、呼び出し元のloggerにメッセージが出力されるため、鉄則と言うか絶対やらなきゃいけないことで書いたlogは省略することができる場合もあります。

static void momikesanaiTheException(SomeObject input) throws InvalidInputException{  
  try {  
    someOperation(input);  
  } catch (InvalidSyntaxException e) {  
    throw new InvalidInputException(input, "Input contains some invalid value and some Operation failed.", e);  
  }  
}  
public class InvalidException extends Exception{  
  private final SomeObject input;  
  public InvalidInputException(SomeObject input, String message, Throwable e) {  
    super(message, e);  
    this.input = input;  
  }  
}  
  

チェック例外などと書いたのは、非チェック例外を投げるケースも少なからずあるためです。

非チェック例外を投げる場合は、必ずJavadocのthrows欄に明記するようにしましょう。

※1:RuntimeExceptionもしくはそれを継承した、呼び出し元でtry-catchしなくてもコンパイルエラーが起きない例外。呼び出し元に瑕疵がある場合に投げられることが多い。NullPointerExceptionやIllegalArgumentExceptionなど。

※2:Exceptionもしくはそれを継承した、呼び出し元でのtry-catchを義務付ける例外。I/Oでのエラーやプログラムの実行ユーザーが権限を持っていない場合など、ロジックやinput由来ではない時に投げられることが多い。IOExceptionやExecutionExceptionなど。

いつ使うべきか

実際の開発現場ではこのように独自の例外を実装して呼び出し元に返す方法はよく使われています。
あえて使用場面をあげるなら以下のようになります。

  • 発生した例外に対し、自分の実装したメソッド内での消化が難しい場合
  • 呼び出し先クラスがチェック例外を投げるべきところで非チェック例外を投げている時
  • 例外のハンドリングに自信がない場合(早く抜けてください。許されるのは最初だけです。)

余談

僕は過去ベトナムの開発会社にいた時、JavaDocが全く書かれていないにも関わらず、何でもかんでも例外を非チェック例外に包んで投げまくるのがデフォルトと言う、地獄のようなプロジェクトに参加したことがあります。

その時は、ありとあらゆる箇所でハンドルされない例外が投げられまくり、何かあるとすぐシステムが落ちると言うえげつない状況に陥りました。

4: 返り値のクラスで結果を表現する

実装難易度: ★★★★
実用性: ★★★★
安全性: ★★★

解説

処理の結果をクラスで表現するのもありです。
具体的に書くと、成功した場合の返り値となる値と失敗した場合の情報を1つのクラスにして返す方法です。

例えば、以下のようなResultクラスを実装し、それを呼び出し元に返すようにします。
(@Builderや@Getterと言うのはlombokアノテーションです。詳しくはlombok公式ページへ)

@Builder(access = AccessLevel.PRIVATE)
@Getter
public class MomikesanaiResult {
    private final ResultType result;
  private final List<SomeResult> successResults;
  private final Map<FailedCauseType, List<SomeInput>> failedInputs;

  private MomikesanaiResult(ResultType result, List<SomeResult> successList, Map<FailedCauseType, List<SomeInput>> failedInputs) {
    this.result = result;
    this.successResults = Optional.ofNullable(successList).map(Collections::unmodifiableList).orElse(Collections.emptyList());
    this.failedInputs = Optional.ofNullable(failedInputs).map(Collections::unmodifiableMap).orElse(Collections.emptyMap());
  }

  public static class MomikesanaiResultBuilder {
    public MomikesanaiResultBuilder addSuccess(SomeResult result) {
      if (this.successResults == null) {
        this.successResults = new ArrayList<>();
      }
      this.successResults.add(result);
      this.result = this.failedInputs == null ? ResultType.SUCCESS : ResultType.PARTIALLY;
      return this;
    }

    public MomikesanaiResultBuilder addFailed(FailedCauseType failedCause, SomeInput input) {
      if (this.failedInputs == null) {
        this.failedInputs = new HashMap<>();
      }
      if (!this.failedInputs.containsKey(failedCause)) {
        this.failedInputs.put(failedCause, new ArrayList<>());
      }
      this.failedInputs.get(failedCause).add(input);
      this.result = this.successResults == null ? ResultType.FAILED : ResultType.PARTIALLY;
      return this;
    }
  }
    
  public enum ResultType {
    SUCCESS, FAILED, PARTIALLY
  }

  public enum FailedCauseType {
    NONE,AUTH_INVALID, INVALID_INPUT, TIMEOUT, UNKNOWN
  }
}

このようなクラスを実装することで、以下のように具体的にエラーと結果を受け手に返すことができます。

static void momikesanaiTheException(List<SomeInput> inputs) throws InvalidInputException{  
  val resultBuilder = MomikesanaiResult.builder();  
  for (SomeInput input : inputs) {  
    try {  
      resultBuilder.addSuccess(someOperation(input));  
    } catch (IllegalArgumentException e) {  
      log.error("Input contains some invalid value and some Operation failed. input is {}", input, e);  
      resultBuilder.addFailed(FailedCauseType.INVALID_INPUT, input);  
    } catch (AuthFailedException e) {  
      log.error("Authentication is failed in some Operation. input is {}", input, e);   
      resultBuilder.addFailed(FailedCauseType.AUTH_INVALID, input);  
    } catch (TimeoutException e) {  
      log.error("Request seems to be timeout in some operation, input is {}", input, e);  
      resultBuilder.addFailed(FailedCauseType.TIMEOUT, input);  
    } catch (Exception e) {  
      log.error("Unknown error occured in some operation, input is {}", input, e);  
      resultBuilder.addFailed(FailedCauseType.UNKNOWN, input);  
    }  
  }  
  return resultBuilder.build();  
}  

なお、ResultTypeとFailureCauseTypeをenumにする理由は、受け手側がswitchでより簡易にerrorハンドリングを実装できるようにするためです。
また、Map<FailureCause, List<SomeInput>> のようなコレクションやマップのネストは気持ち悪い場合は別の構造体を定義しても大丈夫です。

いつ使うべきか

かなり実装コストが高いですが、それなりにメリットの大きい実装になります。
使用場面をあげると、

  • 他のサービスや外部の開発チームに提供されるライブラリ・SDKなど
  • パースしてWebApiやXHRの返り値に使う場合(ユーザへの通知はAPIの呼び出し元が行う。webならjavascriptでトースターを表示するなど。)
  • 多くの開発者に使われる基盤クラス
  • 例外を投げたくない場合

などなど、個人的には、後述のEitherが使えない現場では個人的にこの実装を勧めています。

5: Either型で返す

実装難易度: ★
実用性: ★★
安全性: ★★★

解説

Either型は関数型でよく使われる型で、成功した結果もしくは失敗した例外を返すと言う型です。
関数型では、呼び出したメソッドを返り値に置換しても同じ挙動ができることを担保すべしと言う考え方があり、例外を投げること自体があまり好まれません。

したがって、メソッドの返り値として、成功した値もしくは発生しうる例外をEither型で指定することで、例外をthrowするのを回避すると言うやり方が取られることが非常に多いです。

Either型では伝統的にright(右, 正しいと言う意味もある)に成功した時の値を、left(左)に例外を入れて呼び出し元に返します。

なお、Either型はJava標準ではサポートされていないため、Functional Javaなどの依存性を追加するか、自前で実装する必要があります。(サンプルコードはFunctionalJavaEitherを使用)

static Either<FileNotFoundexception, FileReader> momikesanaiTheException(SomeObject input) {  
  try {  
    return Either.right(new FileReader(new File(input.getTargetPath())));  
  } catch (FileNotFoundException e) {  
    log.error("File not found to the path {}", input.getTargetPath(), e);  
    return Either.left(e);  
  }  
}  
  

割と僕の周りではこの型を好む人が多いですが、周囲の開発者が関数型に慣れていない場合、呼び出し元の開発者がうまく使えない可能性が高く、日本の開発者環境においてうまく機能する現場はあまりないかもしれません。

下手に導入するとExceptionよりもみ消されるという結果になることも無きにしも非ずです。

ただし、Eitherは非常に強力な型で、シンプルな実装で安全かつ正確に何が発生したかを呼び出し元に伝えることができます。
したがって、一通り使い方を覚えるだけでかなり表現の幅が上がるため、マスターしておいて損はありません。

詳しく知りたい人は以下の記事を参考にしてみてください。
参考: Lazy Error Handling in Java, Part 3: Throwing Away Throws

また、こちらは僕の愛読書になります。
下のiframeはアフィリエイトなので、アフィなんて死んでも踏みたくないという方はこちらから

僕はScalaは申し訳程度にしか書けませんが、関数型の概念を言葉とコードでかなり詳細に説明してあり、仕事では常に携帯しています。 まじオススメです。

いつ使うべきか

前述の通り、Eitherは非常に強力ですが、受け取り側にもそれなりの知識が必要になるので、周囲の開発者の知識量などに合わせて使うべきです。
使用場面としては、

  • Exceptionを投げたくない場合
  • 失敗した場合と成功した場合の返り値を一つの型で表現したい時
  • 関数型を使う風土が社内もしくは最低限チーム内に共有されている時

となります。

まとめ

以上、初学者向けに例外が発生した場合のハンドリングの仕方を書いてみました。

ほんとはfrontendに絡めたり、呼び出し元がどういう風にこのエラーハンドリングに対して対応するかなども、コードとして書きたかったのですが、時間切れでした。

プログラミングを自習したり、自分専用のアプリを作ったりしてるうちは、例外の処理は甘くなりがちです。
しかし、実際にお客さんに使われるシステムやサービスでは、例外処理とロギングこそ、最も時間と経験と知識を費やす箇所になります。

上記で紹介したエラーハンドリングの方法も、どれか一つだけを使うわけではなく、状況に合わせて組み合わせて使うことも多くあります。
そこらへんのことも、そのうち記事に書きたいなとか、ぼんやり考えています。

あ、あと今回書かなかったけど、呼び出し元がエラーハンドリングしやすいように実装してやるのも大事だよっていうのを書き忘れていたので、補足でそれも意識するといいと思います。(雑ですみません。。。)

以上、Exceptionをもみ消すなってどうせえちゅうねんっていう話でした。
この記事が、上司や先輩から例外をもみ消すなと言われて途方に暮れている初学者の方々の助けになれば幸いです。

REST API開発者はPOSTも冪等になるように設計して欲しいよねって言う話

こんにちは。
もう冬なのにこの国にはまだ蚊が出るんですよね…やってらんねえ〜〜。

さて、そろそろこの国に来て二年になるので、後一年くらいしたら北欧の方に移住しようかと考えています。
2月に長期休暇が取れそうなので、二週間くらい書けてエストニアを中心にヨーロッパの下見旅行に行こうかなと考えています。
エストニアの現地コミュニティに連絡をとったところ、何人か合ってくれそうな開発者がいたので、今からとても楽しみです。

あと、AWSのSolution Architect Professionalの勉強を始めました。
流石にそろそろとっておかないと色々厳しいので、この動画を使って勉強してます。

AWS Certified Solutions Architect (CSA) Professional: Exam | Udemy

超わかりやすい、焦る。
たぶんネイティブじゃないけど、英語もはっきりしてて、1.25 ~ 1.5倍速くらいで聞いてても全然入ってきます。 今年中に取れるかなぁ…来年までかかるかなぁ…とりあえずがんばります。

さて、今回は短めの記事です。

本題

分散型アプリの開発をしていて、別の開発者とPOSTの仕様で少し討論になったので、メモがわりに残しておきます。
このDiscussionのおかげで私はidempotentと言う単語を完全に記憶しました。

冪等性に関する簡単な説明

初学者向けにまず 冪等性(Idempotency) に関する説明です。
冪等性という言葉に関しては、Wikipediaの言葉を引用すると

ある操作を1回行っても複数回行っても結果が同じであることをいう概念である

とあります。

簡単に身近な例で例えると、

  • 汚れたお皿Aに洗うと言う行為を1回やる → 綺麗なお皿Aが残る
  • 汚れたお皿Aに洗うと言う行為を100回やる → 綺麗なお皿Aが残る

という感じで、洗うと言う行為はお皿に対して冪等な操作であると言えます。

一方、ポケットのビスケットを叩いて増やす歌を考えると

  • ポケットを叩く → ビスケットが2つ
  • もひとつ叩く → ビスケットが3つ

となり、叩くごとにポケットの中のビスケットは増えていくため、叩くと言う行為はポケットに対して冪等でない操作と言えます。

システム開発で例えると、

  • データベースのQUERY -> 何回叩いてもDBのレコード群の状態を変えない -> 冪等である

ですが、

  • INSERTをIncrement IDで流す -> 叩いた数だけレコードが作成される -> 冪等ではない

と言う感じになります。

この説明は全く厳密でないため、もっと詳しく知りたい方は @KyojiOsada さんの記事がとてもくわしく書かれており、とても参考になったので、ぜひそちらを読んでみてください。

参考記事: 冪等と安全に関する誤解

REST APIのメソッドごとの割り当て

詳しくは以前書いたこちらの記事に詳しく書きましたが、REST APIに置いて、リソースに対する操作は基本的に、HTTPのメソッドごとに処理を割り当てます。

そのうち、GET, PUT, DELETEなどのメソッドは、冪等性が保証されなくてはいけません。
(参考:REST API Tutorial)

一方で、POSTに関しては明確に

POST is NOT idempotent. (POSTは冪等ではない)

と言う風に記述されてます。

もうすこし上述のサイトのPostに関する部分を引用すると、

Generally – not necessarily – POST APIs are used to create a new resource on server. So when you invoke the same POST request N times, you will have N new resources on the server. So, POST is not idempotent.

要約すると、必須ではないが、一般的にPOSTは新しいリソースを作成するのに使用されるため、N回呼ばれればN個のリソースを作成されることが多いため、POSTは冪等ではない、と言う風に書かれています。

分散型アーキテクチャとWebAPIのエラーハンドリング

MSAなどサービス同士の疎結合を維持しながらWeb API経由でコミュニケーションをとるアーキテクチャを取る場合、クライアント側は以下のエラーの可能性を気にしながら実装を行う必要があります。

エラータイプ 代表的なステータス 対応例
即時の復旧が見込まれる一時的なServerエラー 503, 504, 509など 一定時間sleepさせたあとリトライする。
MQなどに流して復旧後にリトライ
復旧に長期間かかる(可能性のある)Serverエラー 500, 501, 502, 507など 処理を中断してロールバック
MQなどに流して復旧後にリトライ
ユーザにwarningを提示し復旧後に再度処理を流してもらう
リトライ可能なクライアントエラー 401, 407, 408, 429など 再認証したのちリトライ
一定時間sleepさせたあとリトライ
タイムアウトを伸ばしてリトライ
リトライ不可能なクライアントエラー 400, 403,405, 406など 入力をマスクしたのちlogに出力し開発者に通知
ユーザにwarningを提示し復旧後に再度処理を流してもらう
状況によっては無視できるクライアントエラー 404, 409など 既存オブジェクトを確認して同一ならスキップ(409)

※対応例やレスポンスのステータスコードはあくまで例示であり、通信先のサービスの仕様やビジネス要件に依存します。期待されるエラーやリトライ方法は鵜呑みにせず、自分のサービスや通信先の仕様や要件に合わせて柔軟に設計・実装してください。

また、WebApi経由の処理群はトランザクション管理が難しいため、処理群の中のAPIコールが1つでも失敗した場合、一連の処理を流し直したり、作成・編集された可能性のあるレコードを全てロールバックしたりと言う処理を行う必要があります。
(ここに関してはpub-subなどを利用した回避方法もあるのですが、それはアドベントカレンダーの記事で紹介します。多分。)

POSTが冪等性じゃないと困る理由

以上のように、Web APIコールで処理を行う設計の場合、多くのケースでAPIコールで失敗した場合ロールバックやリトライの処理を挟む必要があります。

単純にロールバックして処理を終える場合はまだいいのですが、リトライを行う際にPOSTが冪等性でない場合、APIコールごとにリソースが作成されるため、一旦すでに作成された可能性がある要素を削除して再度作り直すという処理が必要になり、リトライのコストが高くなります。

Web APIというのは使用者にとって使いやすく設計することが最も重要であり、リトライにたいするコストが高いAPIはいいAPIとは言えません。

POSTを冪等にするための実装

POSTを冪等にするための実装方法は、GOOGLEで検索するといくつか出てきますが、僕はPOSTを設計する際、よくResourceのIDを事前に指定して作成するようにしています。

例えば、

  
/api/docs/${docType}/${docId}

と言うRestfullなpathを設計した場合、一般的にはPOSTは一つ上の階層の/api/docs/${docType}/にたいして処理を割り当てることが多いですが、ここで/api/docs/${docType}/${docId}に対してもPOSTを割り当てられる用にします。

このような設計にした場合、

  • IDが重複しないこと
  • 重複した場合適切なHTTP Statusを返す事 -重複した場合、できるだけClient側でGetし直さずにエラーハンドリングができるようにすること

などを設計の段階で織り込んで置く必要があります。

IDのコンフリクト回避には、UUIDのversion4や、作成したいリソースのhashから作成したUUIDなどを使い、作成方法をAPI Docsなどに明示します。 ←ここ大事

作成したいリソースのHashから作成する場合、一意性を強固にするため、作成時間のTimestampと作成者のIDを必ず含めるようにしてhashを作成し、Pathに割り当てた上でPOSTしてもらいます。

また、エラーハンドリングを用意にするため、作成が成功した場合200を、已に作成されていた場合は409を返すようにします。
IDがConflictする可能性はほぼゼロと言っていいレベルで低いですが、409が返す時、一緒に作成者のIDのSHA256HashおよびTimestampを返す用に設計すれば、409が返ってきた際にもAPIの利用者は安心して作成をスキップすることができます。

また、僕がメンバーと議論してる時に大いに参考にさせていただいた、Saurav SinghさんのHow to achieve idempotency in POST method?では、headerにidempotentKeyを設定し、そのidempotentKeyをなんらかのStorageに保存するという方法が紹介されています。

個人的にはやや冗長に感じるためあまりモチベーションはわかないのですが、こういう方法もあるんだなといい勉強になりました。

まとめ

POSTは一般的に冪等性が担保しにくいメソッド、もしくは担保しなくていいメソッドという認識が一般的かもしれません。
しかし、POSTの冪等性をAPI開発者側が担保してやることで、リトライやロールバックが用意になり、利用者からはより使いやすいAPIになると僕は考えています。

通信先のサービスの一部のNodeが落ちていることや、リクエスト過多によるスケーリング中でタイムアウトしてしまうことなど、分散型では日常茶飯事です。

フォールトトレラントなAPIを提供するためにも、明確にPOSTの冪等性を担保することは有意義だと考えています。

もしこの記事がこれからAPIを設計しようとしている誰かの役に立てば幸いです。

JavaのFutureの取り回しがダルすぎるので色々工夫してみる

まえがき

街の名はホーチミン1区。
一夜にして崩落・再構成されパフォーマンス向上の租界となったこの都市は、マルチスレッドを臨む境界点で、極度の緊張地帯となる。  
ここで世界の均衡を守るため暗躍するJava標準クラスFuture。この物語はこのFutureに挑む開発者の戦いと日常の記録である。  
(血界戦線風)  

ということで、久々の記事はjavaの非同期処理の返り値ラッパーである、Futureの取扱いについて、僕がよくやる実装Tipsについて書いていきたいと思います。

今回のテーマとしては、

  • マルチスレッド、非同期処理でも上手いことエラーハンドリングしたい
  • Futureの返り値展開をスッキリさせたい

の2つです。

1. 標準的な非同期処理とFutureの取り回し

Javaでマルチスレッド処理を書く際、多くの人は以下のような処理を書いていると思います。

  1. Executorsクラスでスレッドプールを作成する
  2. Callable/Runnableを実装したサブクラスを作成する (もしくはLambda式を使う)
  3. ExecutorServiceのsubmitで別スレッドに処理を任せる
  4. 返り値のFutureをListなどに格納する
  5. 全部を別スレッドに投げ終えたところでlistの中のFutureクラスのgetメソッドで同期を取る
  6. チェック例外のInterruptedExceptionExecutionExceptionを処理する

コードにするとこんな感じ。(Exceptionでウケるなとか、parallelStream使うなとかは見逃してください。)

@Slf4j
public class Main {
  public static void main(String[] args) {
    // If wanna make it parallel with 100 threads.

    val executor = Executors.newFixedThreadPool(100);

    val futureList = IntStream.range(0,100)
        .mapToObj(num -> executor.submit(() -> waitAndSaySomething(num)))
        .collect(Collectors.toList());
   
    futureList.parallelStream()
        .map(future -> {
          try {
            return future.get();
          } catch (Exception e) {
            log.error("Error happened while extracting the thread result.", e);
            // Do something for recover. Here, just return null.
            return null;
          }
        }).forEach(System.out::println);
    executor.shutdown();
  }

  static String waitAndSaySomething(int num) {
    try {
      Thread.sleep( num%10 * 1000);
    } catch (Exception e){
      // do nothing since just sample
    }
    if (num%2 ==0)
      throw new RuntimeException("Error if odd");
   return num + ": Something!";
  }
}

わりとよくあるコードだけど、Futureのget部分が冗長で書くのがダルい。
しかも、どのinputがエラー起こしたのかがわからないのでエラー処理がとても難しい。

2. まずエラー処理がちゃんとできるようにしてみる

Javaでマルチスレッドを実装する時、処理にinputを渡す方法は大体次の2つのうちのどちらかになる。

  1. Callable/Runnableを実装したクラスにプロパティとして持たせて、newする際にコンストラクタの引数で渡す。
  2. Lambdaの外部に宣言したfinalの変数をLambda式の中から参照する。

ただし、このいずれの場合も、エラーハンドリングは難しい。

1の場合、スレッドインスタンスを保存しておくのはそもそも微妙だし、FutureとThreadインスタンスのマッピングを何処かで管理しなきゃいけない。

2の場合、Futureからは投げた元のthreadの引数を取得できないためどのinputに対して起きたエラーなのか判別がつかない。

そこで、この問題を解決するために、以下の方法を取ることにしました。

Tupleを使ってプロパティとFutureをまとめて管理する

Tupleは簡単に言うと、複数の値の組のことで、プログラミングでよく使われる概念です。

Javaには標準でTupleが提供されて無いのですが、同様の方法は色々あって、Common LangPairTripleクラス、reactorTupleクラスやJavaTuplePairクラスなどを使って実現できます。

(複雑なクラスじゃないので、自分で実装してもいいです。)

Tupleを使って、inputをLeftに、FutureをRightに保存するようにすることで、Error処理で入力元の値を利用したエラー処理ができるようになります。

え?propertyがたくさんある?inputが重すぎてOOM起こしそう??設計を見直さんかい。

さて、今回はほぼすべてのプロジェクトで使われてると思われる、Commons LangのPairを使ってみます。
Tupleを使うと上のmainクラスはこんな感じに書き直せます。

@Slf4j
public class Main {
  public static void main(String[] args) {
    // If wanna make it parallel with 100 threads.
    val executor = Executors.newFixedThreadPool(100);
 
   val futureList = IntStream.range(0,100)
        .mapToObj(num -> Pair.of(num, executor.submit(() -> waitAndSaySomething(num))))
        .collect(Collectors.toList());

    futureList.parallelStream()
        .map(future -> {
          try {
            return future.getRight().get();
          } catch (Exception e) {
            log.error("Input {} was not processed correctly.", future.getLeft(), e);
            // Do something for recover. Here, just return null.
            return String.format("Input %s Failed in process, damn shit!! ", future.getLeft());
          }
        }).forEach(System.out::println);

    executor.shutdown();
  }

これで、入力値を利用したエラー処理とLoggingができるようになりました。

ただ、Futureを展開する箇所があいかわらず冗長で、なんだかイライラします。

そこで、次はこの部分を共通化してみます。

3. Futureの展開部分を共通化する

やりたいことはfutureの展開だけなので、そこだけ切り取れば、共通化は非常に簡単です。

一方で、エラー処理はinputに対して相対的に行いたいので、その部分は柔軟にできるような設計にしたいです。

そこで、エラーハンドリングの部分をExceptionとinputを利用して、任意のFunctionで処理できるように以下のようなFutureの展開クラスを用意します。

@RequiredArgsConstructor
public class FutureFlattener<L, R> implements Function<Pair<L, Future<R>>, R> {
  /**
   * Callback function to recover when exception such as {@link InterruptedException} or {@link
   * java.util.concurrent.ExecutionException}.
   */
  private final BiFunction<L, Exception, R> recoveryCallback;

  @Override
  public R apply(Pair<L, Future<R>> futurePair) {
    try {
      return futurePair.getRight().get();
    } catch (Exception e) {
      return recoveryCallback.apply(futurePair.getLeft(), e);
    }
  }
}

これを先程のMainクラスに組み込むと以下のようになります。

@Slf4j
public class Main {
  public static void main(String[] args) {
    // If wanna make it parallel with 100 threads.
    val executor = Executors.newFixedThreadPool(100);

    BiFunction<Integer,Exception,String> errorHandler =
        (in, e) -> {
          log.error("Input {} was not processed correctly.", in, e);
          return String.format("Input %s Failed in process, damn shit!! ", in);
        };
    val flattener = new FutureFlattener<Integer, String>(errorHandler);

    val futureList =
        IntStream.range(0, 100)
            .mapToObj(num -> Pair.of(num, executor.submit(() -> waitAndSaySomething(num))))
            .collect(Collectors.toList());

    futureList
        .parallelStream()
        .map(flattener)
        .forEach(System.out::println);
    executor.shutdown();
  }

しかし、せっかくFunctionインターフェイスを使ってるのに、内部で関数をプロパティに持つのは、正直めちゃくちゃダサいです。

ダサいのはいけません、クールに決めたい。

ということで、もう少しだけ拡張してみます。

4. JavaのFunctionインターフェイスを継承してエラーハンドリングを追加する

多くの他の言語がモナド型のクラスに、onCatchやthenCatchなど、Exceptionが投げられた時のためのメソッドを用意しています。

しかし、残念なことに、JavaのFunction Interfaceはcompose, apply, andThenの成功を前提としたメソッドチェーンしかできません。

そこで、JavaのFunctionインターフェイスを継承して、onCatchを実装してみます。

public interface CatchableFunction<T, R> extends Function<T, R> {

  /**
   * by calling this method in advance of calling {@link Function#apply}, any exception thrown in
   * the apply method will be handled as defined in the argument onCatch.
   *
   * @param onCatch callback method to handle the exception. First Type T is the input of the base
   *     function.
   * @return fail-safe function with a callback. This method will generate a new Function instance
   *     instead of modifying the existing function instance.
   */
  default Function<T, R> thenCatch(BiFunction<T, Exception, R> onCatch) {
    return t -> {
      try {
        return apply(t);
      } catch (Exception e) {
        return onCatch.apply(t, e);
      }
    };
  }
}

Javaの使用上、Type parameterをcatchすることはできないため、Exceptionで受けなくてはいけないのがもどかしいですが、これでかなりfunctionalに書けるようになりました。

このクラスを先程のFutureFlattenerクラスに実装すると以下のようになります。


@RequiredArgsConstructor
public class FutureFlattener<L, R> implements CatchableFunction<Pair<L, Future<R>>, R> {

  @Override
  public R apply(Pair<L, Future<R>> futurePair) {
    try {
      return futurePair.getRight().get();
    } catch (InterruptedException | ExecutionException e) {
      throw new FutureExpandException(e);
    }
  }

  // To be caught in the then catch method.
  private static class FutureExtractException extends RuntimeException {
    FutureExpandException(Throwable cause) {
      super(cause);
    }
  }

チェック例外はLamdba式の中で処理しなくては行けないため、FutureExtractExceptionでラップしてあります。

これでMainクラスもスッキリします。

@Slf4j
public class Main {
  public static void main(String[] args) {
    // If wanna make it parallel with 10 threads.
    val executor = Executors.newFixedThreadPool(100);

    val flattener = new FutureFlattener<Integer, String>()
            .thenCatch(
                (in, e) -> {
                  log.error("Input {} was not processed correctly.", in, e);
                  return String.format("Input %s Failed in process, damn shit!! ", in);
                });

    val futureList = IntStream.range(0, 100)
            .mapToObj(num -> Pair.of(num, executor.submit(() -> waitAndSaySomething(num))))
            .collect(Collectors.toList());
    futureList.parallelStream().map(flattener).forEach(System.out::println);
    executor.shutdown();
  }

  static String waitAndSaySomething(int num) {
    try {
      Thread.sleep(num % 10 * 1000);
    } catch (Exception e) {
      // do nothing since just sample
    }
    if (num % 2 == 0) {
      throw new RuntimeException("Error if odd");
    }
    return num + ": Something!";
  }
}

ネストが減って、関数の宣言もスッキリして、Futureの展開周りのソースもスッキリしました。

終わりに

さて、いかがだったでしょうか?

Functional Javaを使えばもっと楽に実装できたりする箇所はあるのですが、急いでいたため自前で実装してしまいました。

並列処理に関して言えば、最近はkafkaなどのメッセージキューを使って非同期かつ粗結合に作るのが基本ですが、だからといってマルチスレッドを使わないわけではありません。

一方で冗長なFuture展開はネストを増やし可読性を下げるだけでなく、最も気を使うべきエラーハンドリングに気が回らなくなります。

今回僕は上記のような解決方法を取りましたが、いかがだったでしょうか?

もっとええ方法あるで、という方がいらっしゃいましたら、コメント欄にお願いします。

それでは!